

Today we have a Noah's Ark Craft tutorial here on The Inspiration Edit. This Noah's ark craft idea is a fantastic kid's paper plate craft based on the bible story Noah's Ark. This is a fun idea for kids and a great activity to do as you read bible board books with the kids.

I really love Noah's ark, the animals, the rainbow and it's always such a bright and colourful kids craft or bible themed activity to enjoy. We sure hope you enjoy this fun Noah's ark preschool craft. It's super fun!
This is a great way to teach kids about the Noah's Ark story or about animals and rainbows. Enjoy! Why not try these printable bible verse tracing sheets!
Jump to:
💖 Why You'll Love This Craft
- Storytelling Fun: This craft ties in with the biblical story of Noah’s Ark, giving kids a chance to engage with the story as they create.
- Animal Adventures: Little ones can enjoy crafting their favorite animals, which adds a fun and educational element to the activity.
- Perfect for Group Activities: It’s an ideal craft for schools, Sunday school, or family craft time, allowing kids to work together on building their ark and animal pairs!
Noah's Ark Rainbow Craft

🖌️ How To Make Noah's Ark With Paper

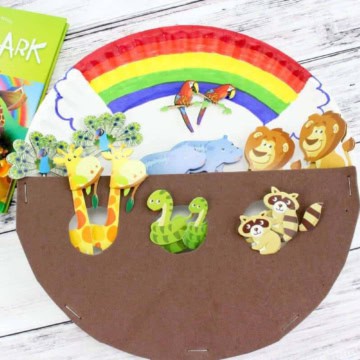
- Step 1: On the top half of the paper plate, colour a rainbow. Start with a thick line of red on the rim of the paper plate, and follow with orange, yellow, green, and then blue.

- Step 2: Now lay the paper plate face down on top of the brown foam. Trace a half circle on the foam around the plate. Cut out the foam, and it should look like half the plate. Cut out 3 small circles in the middle of the foam for little porthole windows.

- Step 3: Turn the plate right side up so the rainbow is at the top, and set the brown foam piece on the bottom half the plate.

- Step 4: Use the stapler to staple the foam to the top edge of the plate. Put about 4-5 staples around the edge.

- Step 5: Now just add the animal stickers. Put some peeking through the portholes, and some on the white plate so it looks like the animals are all on the ark.

- Step 6: Don’t forget to make sure to put 2 of the same animals right next to each other since Noah put 2 of each animal on the ark.
Have Fun!
I sure hope you love this fun and easy ark craft idea.

We sure loved sharing it and I know this will make a great activity for the home or a fun Sunday school bible craft.
💡 Pro Tip: Use a folded background piece behind the ark to mimic rising land or sky—it frames the scene better without changing the main craft layout.
🧑🎨 Expert Tips
- Tiered Display: Arrange animals in two or three vertical rows instead of one flat line—this uses the space more effectively and gives the ark a fuller look.
- Arc Width Guide: Sketch a soft pencil arc across the top for aligning animals—this keeps heads at a uniform height and prevents a crowded or tilted appearance.
- Species Variety: Mix animal sizes and shapes by alternating tall and short figures so no one side looks heavier, and both sides feel evenly balanced.
- Center Emphasis: Place a larger or more expressive animal near the middle to serve as a visual anchor, helping focus attention on the center of the ark.
- Face Direction: Angle a few animals to face different directions—this breaks the uniformity and makes the scene feel more active and natural.
- Boat Overlap: Let a few paws, tails, or ears extend slightly over the ark’s edge to add depth and make the layout feel more three-dimensional.
🖌️ More Kids Art Projects
Love these crafts! Don't forget to pin them on Pinterest or leave a comment and let us know how you got on!


Did you make this craft? Leave a review and comment below! Alternatively, bookmark it in your browser or save to Pinterest.
Noah’s Ark Craft For Kids
Materials
- 1 White Paper Plate
- 1 Sheet Brown Foam
- Animal Stickers 2 of each
- Markers Red, Orange, Yellow, Green, blue
- Stapler
Instructions
- On the top half of the paper plate, colour a rainbow.
- Start with a thick line of red on the rim of the paper plate, and follow with orange, yellow, green, and then blue.
- Now lay the face down on top of the . paper platebrown foam
- Trace a half circle on the foam around the plate.
- Cut out the foam, and it should look like half the plate.
- Cut out 3 small circles in the middle of the foam for little porthole windows.
- Turn the plate right side up so the rainbow is at the top, and set the brown foam piece on the bottom half the plate.
- Use the stapler to staple the foam to the top edge of the plate. Put about 4-5 staples around the edge.
- Now just add the animal stickers.
- Put some peeking through the portholes, and some on the white plate so it looks like the animals are all on the ark.
- Don’t forget to make sure to put 2 of the same animals right next to each other since Noah put 2 of each animal on the ark.
- Have Fun! I sure hope you love this fun and easy ark craft idea.
Have you seen our Noah's Ark Craft Using Popsicle Sticks? It is super cool! We also have some fantastic rainbow crafts here on the Inspiration Edit. We also have a unit study post full of Noah's ark Activity ideas for kids. It may come in handy!
- Hanging Cotton Ball Rainbow Craft
- Sensory Bottle Rainbow Activity For Kids
- R is for Rainbow Worksheets


This looks really cute. What an awesome Idea. I plan on trying this this Sunday for our church’s preschool classroom to go along with our Noah’s ark themed lesson and learning about God’s promise to us and that we should trust in him like Noah did.
that's awesome. have fun with the little ones.