

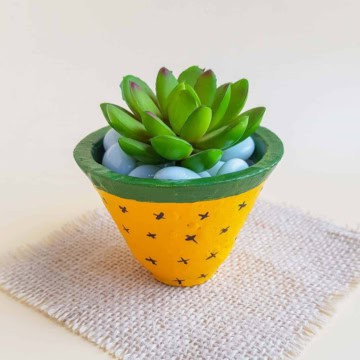
Are you looking for a quick and easy way to liven up your home? This easy Pineapple Vase Planter craft is the perfect way to add a little color, some plant life, and a little flair to your home. You can even do this craft with the kiddos.

Jump to:
💖 Why You'll Love This Craft
- Tropical Vibes, Anytime: Bright, fun, and brings sunshine to any room or patio.
- Totally Customizable: Go classic yellow or mix it up with fun colors and faces.
- Great Gift Idea: Fill it with a succulent and boom—instant happy gift!

🖌️ How To Make a Pineapple Vase Planter

- Step 1: Before getting started, cover your workspace with old newspapers or papers to protect it from paint. Apply a base coat on the outer surface of the clay pot using white acrylic paint. Allow the paint to dry entirely. If the first white coat is too thin, in that case, apply another coat of white acrylic paint. Allow the second coat to dry entirely again.

- Step 2: Decide a pattern or design for the clay pot or planter; I’m doing a simple pineapple pattern. If you choose to paint pineapple pattern as well, apply a coat of yellow acrylic paint on the outer surface of the pot.

- Step 3: Apply coat 2 of yellow paint after the first coat dries.

- Step 4: Now grab a green acrylic paint and apply a 1 cm thin border around the top side of the yellow-painted clay pot. Apply the green paint around the top part of the outer surface, as well as the top edge and 2 cm inside (from the top) the pot. Allow the green border to dry entirely.

- Step 5: You can use black acrylic paint or black sharpie for this step, whichever you prefer. Use the black sharpie (or acrylic paint) to draw cross/arrow patterns on the outer surface of the clay pot. Try to keep the patterns aligned and organized.

- Step 6: And done! Pour some soil mix into the pot and a plant. Succulent plants look great in this pot! Your planter is ready to display!
This is a great, fun, and easy craft for kids or adults and super simple. Enjoy! If you liked this planter vase idea, check out some of our other planter ideas:

💡 Pro Tip: Attach a small chalkboard label to the planter to write messages or plant names, allowing for easy updates and added charm.
🧑🎨 Expert Tips
- Add a Textured Surface: Apply a layer of air-dry clay to the pot before painting to create a bumpy, pineapple-like texture, enhancing the tactile appeal.
- Incorporate Scented Elements: Mix a few drops of pineapple-scented essential oil into the paint or clay to give your planter a pleasant aroma.
- Use Metallic Accents: Highlight the crosshatch pattern with gold or bronze paint to add a touch of elegance and make the design pop.
- Create a Matching Saucer: Paint a matching saucer with complementary colors and patterns to complete the look and catch excess water.
- Personalize with Initials: Incorporate your initials or a short message into the design using stencils or freehand painting for a personalized touch.
- Add a Hanging Option: Attach sturdy cords or chains to transform your pineapple planter into a hanging decoration, perfect for patios or balconies.
🖌️ More Fun Plant Pot Crafts

Did you make this craft? Leave a review and comment below! Alternatively, bookmark it in your browser or save to Pinterest.
Pineapple Vase Planter Craft
Easy tutorial on how to make a pineapple vase craft
Materials
- Clay pot
- Acrylic paint
- Paintbrush
- Black sharpie
Instructions
- Before getting started, cover your workspace with old newspapers or papers to protect it from paint. Apply a base coat on the outer surface of the clay pot using white acrylic paint. Allow the paint to dry entirely. If the first white coat is too thin, in that case, apply another coat of white acrylic paint. Allow the second coat to dry entirely again.
- Decide a pattern or design for the clay pot or planter; I’m doing a simple pineapple pattern. If you choose to paint pineapple pattern as well, apply a coat of yellow acrylic paint on the outer surface of the pot.
- Apply coat 2 of yellow paint after the first coat dries.
- Now grab a green acrylic paint and apply a 1 cm thin border around the top side of the yellow-painted clay pot. Apply the green paint around the top part of the outer surface, as well as the top edge and 2 cm inside (from the top) the pot. Allow the green border to dry entirely.
- You can use black acrylic paint or black sharpie for this step, whichever you prefer. Use the black sharpie (or acrylic paint) to draw cross/arrow patterns on the outer surface of the clay pot. Try to keep the patterns aligned and organized.
- And done! Pour some soil mix into the pot and a plant. Succulent plants look great in this pot!
- Your planter is ready to display!
Tried This Craft?Let us know how it was!

Leave a Reply