

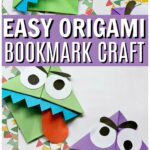

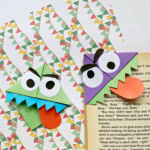
This super cute origami monster bookmark is easy and fun, and it’s a great way to get your kids more interested in reading. They’ll love picking up a book when this DIY corner bookmark is peeking out at them!

Jump to:
💖 Why You'll Love This Craft
- Silly, Not Scary: These monsters are all fun and zero fright—perfect for even the tiniest readers.
- Encourages Reading Time: A monster guarding their page makes kids want to come back for more.
- Great for Parties: Set up a monster bookmark station at a Halloween party or playdate—guaranteed giggles!
You’ll Love These Origami Monster Bookmarks
Corner bookmarks are all the rage these days and this bookmark craft uses simple origami folding techniques to create a fun, sturdy page marker for any book.
Customize your monster corner bookmark with any color paper you like and use our free printable template for the eyes and tongue. Or get creative and use any shapes you like for your bookmark designs!
You could also make a bunch of these bookmarks to give out as party favors or even as a non-candy, allergy-safe alternative for Trick or Treating.
If you’re kids love monsters then we have plenty of monster book ideas and a great monster felt craft tutorial.
I hope you enjoy this origami monster bookmark tutorial!
🎨 Supplies Needed
- Monster Bookmark Template
- Origami Craft Paper
- Scissors
- Paper Glue
- Pencils
- Marker
- Ruler
🖌️ How To Make an Origami Monster Bookmark

- Step 1: Select a colour for your monster and take a square paper of that colour. Place the paper diagonally.

- Step 2: Fold the paper in half by bringing the top point downwards over the bottom point. That will create a triangular shape.

- Step 3: Now take one flap from the middle.point.of the triangle and bring it upwards and fold it there.

- Step 4: Now bring the left and right point downwards and fold it there.

- Step 5: Tuck in the both pointed sides into the top pocket we created in step 3.

- Step 6: Cut out the eyes for the monster using the templates.

- Step 7: Glue both eyes on the upper side of the bookmark.

- Step 8: Then again use the template to cut out the teeth of the monster. Glue the teeth slightly inside the pocket, it will make it look neater.

- Step 9: Then once again use the template to cut out the tongue shape for the monster. Glue the tongue inside the pocket behind the teeth we glued previously. Now finally cut out the eyebrows and glue them on the top of the eyed to finish off the monster bookmark.
💡 Pro Tip: Store several blank folded bases in a labeled envelope so kids can quickly decorate new monster bookmarks without repeating the folding steps each time.
🧑🎨 Expert Tips
- Sharp fold prep: Use your fingernail or a plastic card edge to press every fold firmly—this prevents the corners from puffing up after multiple uses.
- Layer awareness: Align each fold carefully so all layers stack neatly without overhang; this helps the bookmark slide smoothly onto any book page.
- Face spacing: Keep enough blank space between features like eyes and mouth to avoid crowding, especially since the surface area is small.
- Grip test: Once finished, test your bookmark on different page thicknesses to ensure it holds without slipping or creasing the page.
- Flat finish: Place the bookmark under a book for a few minutes post-assembly to flatten any air pockets caused by folding tension.
- Expression change: Slightly tilt the eye shapes or shift the mouth angle to create unique expressions—this gives each monster a personal flair.
🖌️ More Bookmark Craft Ideas


Did you make this craft? Leave a review and comment below! Alternatively, bookmark it in your browser or save to Pinterest.
Download Printable
Get your free Printable Monster Corner Bookmark Template here!
Monster Origami Corner Bookmarks Tutorial
Equipment
- Scissors
- Ruler
Materials
- Origami Craft Paper.
- Paper Glue
- Pencils
- Marker
Instructions
- Select a colour for your monster and take a square paper of that colour. Place the paper diagonally.
- Fold the paper in half by bringing the top point downwards over the bottom point.
- That will create a triangular shape.
- Now take one flap from the middle.point.of the triangle and bring it upwards and fold it there.
- Now.bring the left and right point downwards and fold it there.
- Tuck in the both pointed sides into the top pocket we created in
- Cut out the eyes for the monster using the templates.
- Glue both eyes on the upper side of the bookmark.
- Then again use the template to cut out the teeth of the monster.
- Glue the teeth slightly inside the pocket, it will make it look neater.
- Then once again use the template to cut out the tongue shape for the monster.
- Glue the tongue inside the pocket behind the teeth we glued previously.
- Now finally cut out the eyebrows and glue them on the top of the eyed to finish off the monster bookmark.
MORE CRAFTS YOU MIGHT LIKE:


Leave a Reply