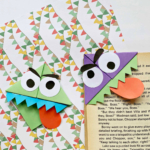
Monster Origami Corner Bookmarks Tutorial
This is a tutorial on how to monster origami bookmark
Calories:
Equipment
- Scissors
- Ruler
Materials
- Origami Craft Paper.
- Paper Glue
- Pencils
- Marker
Instructions
- Select a colour for your monster and take a square paper of that colour. Place the paper diagonally.
- Fold the paper in half by bringing the top point downwards over the bottom point.
- That will create a triangular shape.
- Now take one flap from the middle.point.of the triangle and bring it upwards and fold it there.
- Now.bring the left and right point downwards and fold it there.
- Tuck in the both pointed sides into the top pocket we created in
- Cut out the eyes for the monster using the templates.
- Glue both eyes on the upper side of the bookmark.
- Then again use the template to cut out the teeth of the monster.
- Glue the teeth slightly inside the pocket, it will make it look neater.
- Then once again use the template to cut out the tongue shape for the monster.
- Glue the tongue inside the pocket behind the teeth we glued previously.
- Now finally cut out the eyebrows and glue them on the top of the eyed to finish off the monster bookmark.