

Did you ever wear a mask or make a mask as a child? I remember making one at school. It was a paper mache mask and was so fun to create. I loved making arty things at school and these were always my favourite classes as a little girl, art, and PE.
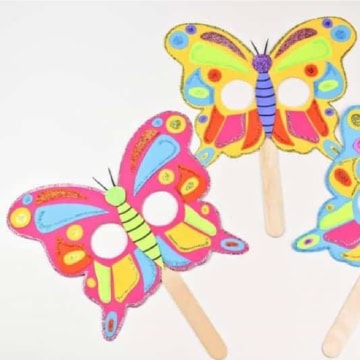
Well, today we have a super cute butterfly mask to make. It is easy to do and we have a free downloadable template to help you! Enjoy!

Jump to:
💖 Why You'll Love This Craft
- Flutter-Tastic Fun: Kids will love fluttering around like magical butterflies!
- Easy to Make: Simple shapes and steps make this a no-stress craft for little hands.
- Spring Vibes Anytime: Brings the joy of spring indoors, no matter the season!

🖌️ Let's Make This DIY Butterfly Mask

- Step 1: Download the template and print out. Cut the butterfly and the eye holes out from the printed template.

- Step 2: Trace the entire butterfly shape onto cardstock and cut out. Cut the eye holes out.

- Step 3: Trace the body of the butterfly onto cardstock and cut out. Set aside. Cut out each shape from the butterfly template. Trace the shapes onto colored cardstock and then cut the shapes out.

- Step 4: Arrange the shapes onto the butterfly and find a color combination and look that you enjoy.

- Step 5: Glue all of the shapes into place on the butterfly.

- Step 6: Draw lines across the body of the butterfly. Refer to the photo.

- Step 7: Add lines of glue to the shapes and decorate with glitter. Shake off excess glitter and allow the glue/glitter to dry completely. Add glue to the head and coat with glitter. Shake off excess glitter. Glue the body of the butterfly onto the middle of the butterfly.

- Step 8: Cut very thin strips from black cardstock.

- Step 7: Glue behind the head. Use a hot glue gun or white glue to add a popsicle stick handle to the mask.

- Step 8: You can also add ribbon to either side of the mask and tie the mask into place. Your butterfly mask is finished and ready to be enjoyed.

This would make a great party activity!
💡 Pro Tip: Use a flexible headband or elastic that stretches around the back, instead of using a stick so the mask can be worn without holding.
🖌️ More Butterfly Craft Ideas

Did you make this craft? Leave a review and comment below! Alternatively, bookmark it in your browser or save to Pinterest.
DIY Butterfly Mask For Kids
Materials
- Cardstock
- Glue
- Pencil
- Popsicle Sticks
- Glitter
- Sharpie
- Template
- Scissors
Instructions
- Download the template and print out. Cut the butterfly and the eye holes out from the printed template.
- Trace the entire butterfly shape onto cardstock and cut out. Cut the eye holes out.
- Trace the body of the butterfly onto cardstock and cut out. Set aside.
- Cut out each shape from the butterfly template.
- Trace the shapes onto colored cardstock and then cut the shapes out.
- Arrange the shapes onto the butterfly and find a color combination and look that you enjoy.
Glue all of the shapes into place on the butterfly. - Draw lines across the body of the butterfly.
- Add lines of glue to the shapes and decorate with glitter.
- Shake off excess glitter and allow the glue/glitter to dry completely.
- Add glue to the head and coat with glitter.
- Shake off excess glitter. Glue the body of the butterfly onto the middle of the butterfly.
- Cut very thin strips from black cardstock. The glue behind the head.
- Glue behind the head. Use a hot glue gun or white glue to add a popsicle stick handle to the mask.
- You can also add ribbon to either side of the mask and tie the mask into place. Your butterfly mask is finished and ready to be enjoyed.
- Your butterfly mask is finished and ready to be enjoyed.
You May Also Like These Fun Kids Craft Ideas:
Paper Bag Frog And Duck Puppet

Leave a Reply