

If you're looking for Strawberry craft ideas then look no further! I love strawberries. They are my favourite fruit and I really enjoy eating them all year round.
When I lived in New Zealand strawberries were really expensive. I'm so pleased I live in the UK where I can get my favourite fruit for a fraction of the price.
Today we have a fun and easy to make Strawberry craft for preschoolers. This easy fruit craft is perfect for kids looking to have some crafty fun in the Summer. You can also try this out in the preschool setting or kindergarten!
This will make a fantastic strawberry art and craft for preschoolers. Enjoy!

Jump to:
💖 Why You'll Love This Craft
- Deliciously Fun: Who doesn’t love strawberries? This craft is as sweet as the fruit itself! It’s a fun, food-inspired activity that’s perfect for kids who love crafting and love fruity treats.
- Simple and Quick to Make: This craft doesn’t require a ton of materials, and it’s quick enough to keep even the youngest crafters engaged.
- Customizable for Creative Expression: You can even make different types of strawberries—big ones, tiny ones, or even heart-shaped ones
🎨 Supplies Needed
- Paint
- Black Paint Pen or Black Permanent Marker
- Wooden Eggs
- Paint Brush
- Card stock
- Hot Glue
- Pencil
- Strawberry Craft Template
🖌️ How To Make This Strawberry Craft

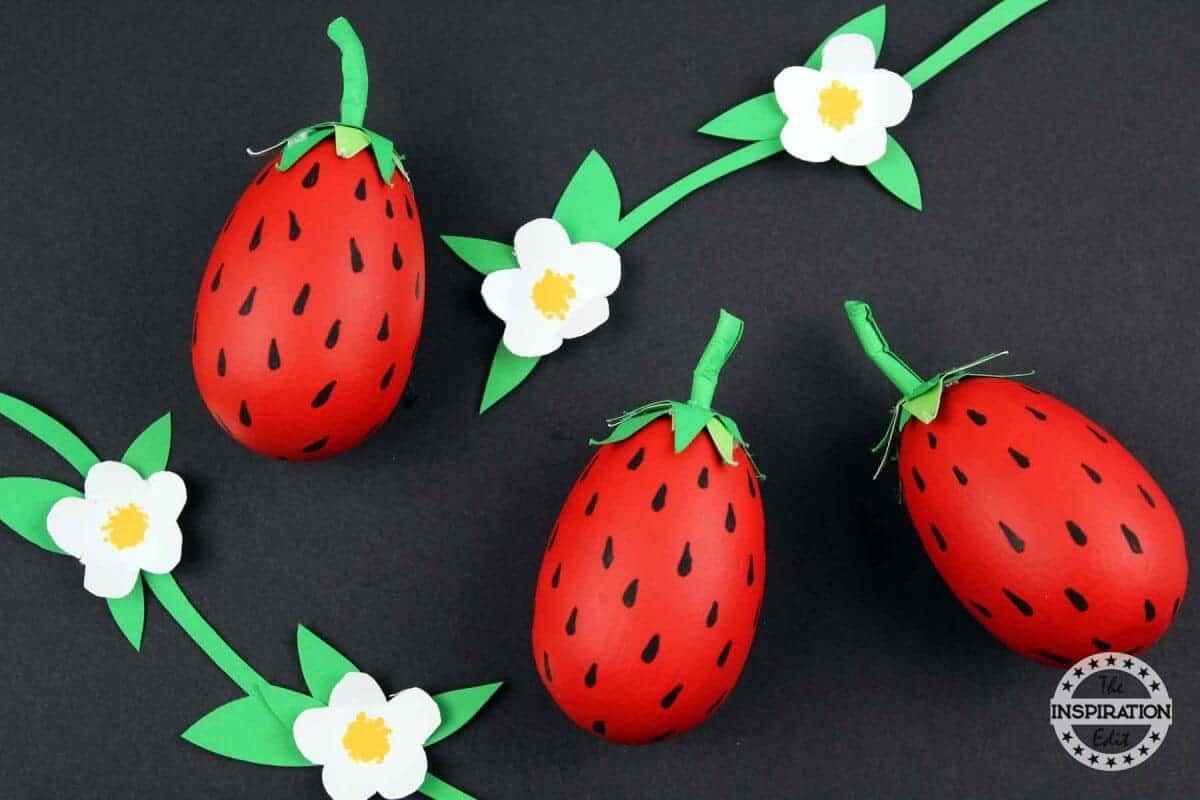
- Step 1: Paint the wooden eggs red. You will need to give each egg 2-3 coats of paint. Allow the paint to dry completely. Download the template and print out. Cut the strawberry template out.

- Step 2: Trace the leaves of the strawberries onto various shades of green card stock and cut out.

- Step 3: Trace the flower onto white cardstock and the blossom vines onto green cardstock.

- Step 4: Cut out the strawberry blossoms. Glue the leaves onto the top of the strawberries, adding 2-3 layers. Cut a long thin strip of green card stock and roll up. Cut it into one inch pieces and bend and twist them a bit. Glue them onto the top of the strawberry leaves.

- Step 5: Use a black paint pen or black permanent marker to draw seeds all over the strawberry.

- Step 6: Glue the white flowers onto the blossom vines.

- Step 7: Dab yellow glue into the center of the white flowers. Allow the paint to dry completely. Your eggs are finished and ready to be displayed. What a fantastic strawberry fruit craft idea!

🖌️ More Fun DIYs
Love these crafts! Don't forget to pin them on Pinterest or leave a comment and let us know how you got on!


Did you make this craft? Leave a review and comment below! Alternatively, bookmark it in your browser or save to Pinterest.
Download Template
Download your free Printable Strawberry Eggs Template here!

DIY Strawberry Craft For Kids
Instructions
- Paint the wooden eggs red. You will need to give each egg 2-3 coats of paint. Allow the paint to dry completely.
- Download the template and print out. Cut the strawberry template out.
- Trace the leaves of the strawberries onto various shades of green card stock and cut out.
- Trace the flower onto white cardstock and the blossom vines onto green cardstock.
- Cut out the strawberry blossoms.
- Glue the leaves onto the top of the strawberries, adding 2-3 layers.
- Cut a long thin strip of green card stock and roll up.
- Cut it into one inch pieces and bend and twist them a bit.
- Glue them onto the top of the strawberry leaves.
- Use a black paint pen or black permanent marker to draw seeds all over the strawberry.
- Glue the white flowers onto the blossom vines.
- Dab yellow glue into the center of the white flowers.
- Allow the paint to dry completely.
- Your eggs are finished and ready to be displayed. What a fantastic strawberry fruit craft idea!
You may also enjoy the following Summer crafts!


Leave a Reply