

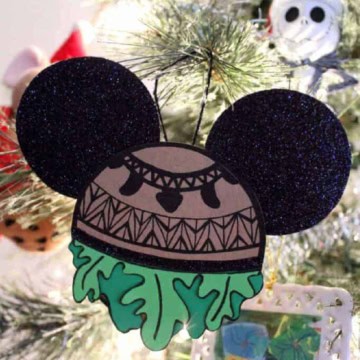
If you love the Disney movie Moana you're going to love this fun and easy Maui Christmas Ornament. This is a fun and simple Christmas paper craft and one the kids will love. With only a few supplies you can make this fun Moana crafts DIY decoration! Your Christmas tree will love full of festive Disney fun! Enjoy!

Jump to:
💖 Why You'll Love This Craft
- Holiday Meets Hero: Mixes Christmas cheer with Maui’s larger-than-life personality for a totally fun tree decoration.
- Mini Hook Magic: Kids will love making Maui’s iconic fishhook—it’s the coolest detail on this ornament!
- Sturdy & Giftable: Made from paper but packed with personality, this ornament is lightweight and perfect for gifting to fellow Disney fans.
Fun Facts About Maui From Moana
Here are some super fun and interesting facts all about Maui from Moana!
- Maui originally was drawn as bald for the movie!
- "The Rock" is the voice (and singing voice!) in the film.
- His outfit in Moana was created based on whatever materials would have actually been available to use thousands of years ago.
Tips for Making This Disney Christmas Paper Craft
The biggest thing to remember when making this Disney ornament craft is that you want to be certain to let the glue dry all the way before hanging onto your tree.
🎨 Supplies Needed
🖌️ How to Make This Maui Christmas Ornament

- Step 1: The first thing you need to do to make this Maui paper craft is download the Maui template.

- Step 2: Print each of the pages from the 4 page template on the correct color of card stock. The color is listed at the top of each page. You’ll have extra pieces, so you can use them to make more than one Maui craft. For each Maui ornament, cut out 2 black ears and 1 each of the other pieces.

- Step 3: Glue the ears behind the head and the other pieces to the front. Add black glitter to the ears and the stripe above the leaves.

- Step 4: Make a hanger by looping a piece of twine and gluing it to the back of the ornament. Let the ornament dry completely, and then Maui is ready to be proudly displayed.
💡 Pro Tip: Seal the completed ornament with a clear, matte spray to protect the layers and textures while maintaining the crafted look.
🧑🎨 Expert Tips
- Material Contrast: Combine matte and glossy papers to create a dynamic visual effect, enhancing the ornament's depth and interest.
- Layer Stacking: Assemble elements in a back-to-front sequence, starting with the base and building up to the finer details, to achieve a three-dimensional appearance.
- Edge Shading: Lightly shade the edges of each paper piece with a colored pencil to add subtle depth and separation between layers.
- Texture Variation: Incorporate different textures, such as corrugated paper for the loincloth or glitter paper for accessories, to enrich the tactile experience.
- Dimensional Adhesives: Use foam adhesive dots to elevate certain elements, like the necklace or facial features, adding a pop-out effect.
- Detail Accents: Apply fine glitter or metallic pens to highlight specific areas, such as tattoos or jewelry, for added visual interest.
Download Template
Download your free Maui Printable Template here!
🖌️ More DIY Paper Ideas
Love these crafts! Don't forget to pin them on Pinterest or leave a comment and let us know how you got on!


Did you make this craft? Leave a review and comment below! Alternatively, bookmark it in your browser or save to Pinterest.
More Christmas Crafts to Enjoy
- Easy Christmas Paper Plate Crafts
- Olaf Christmas Ornament Craft With Free Template
- Disney Beast Mickey Ears Christmas Ornament
- Frozen Anna Christmas Ornament Craft

Easy Paper Maui Christmas Ornament
Materials
- Cardstock
- Glue
- Scissors
- Ribbon, Thread, Twine Et
- Glitter
Instructions
- The first thing you need to do to make this Maui paper craft is download the Maui template.
- Print each of the pages from the 4 page template on the correct color of card stock. The color is listed at the top of each page. You’ll have extra pieces, so you can use them to make more than one Maui craft. For each Maui ornament, cut out 2 black ears and 1 each of the other pieces.
- Glue the ears behind the head and the other pieces to the front.
- Add black glitter to the ears and the stripe above the leaves.
- Make a hanger by looping a piece of twine and gluing it to the back of the ornament. Let the ornament dry completely, and then Maui is ready to be proudly displayed.

Leave a Reply