
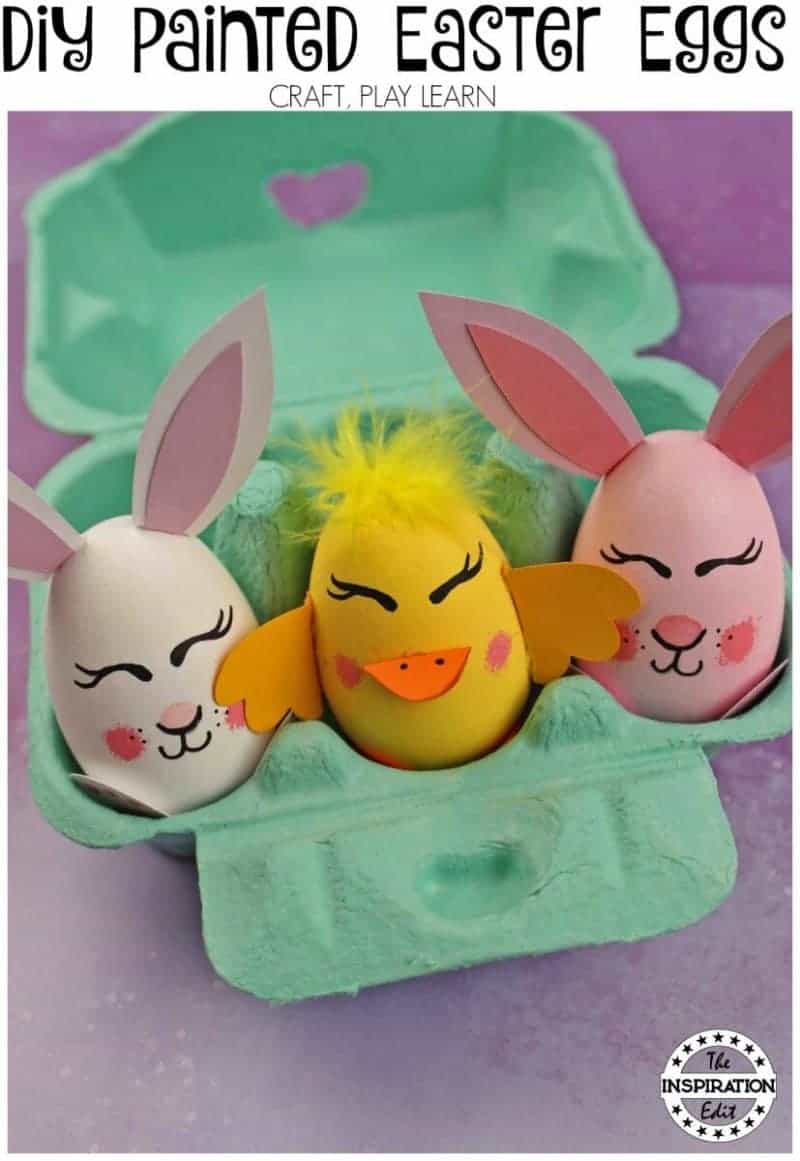
Chick Easter Eggs are a fun and adorable craft to try this season! Today on The Inspiration Edit, we’re sharing DIY Rabbit and Chick Easter Eggs that you’re going to love. These little cuties are easy to make, and we’ve even included a printable template for the wings and feet to make crafting a breeze. They’re perfect for adding a touch of Easter charm to your day! Enjoy
Oh I'm so egg-cited to share these with you! Seriously... They are super funky and I love them!
Jump to:
💖 Why You'll Love This Craft
- Eggstra Cute Creations: Turn plain eggs into the most adorable bunnies and chicks ever!
- Perfect for Easter Displays: These cuties look amazing in baskets, centerpieces, or egg hunts.
- Great for Family Craft Time: A fun activity everyone can enjoy together before the big egg hunt!
Chick Easter Eggs Crafts
Chick Easter egg crafts are an adorable and fun way to get the kids excited for Easter! With a little paint, glue, and creativity, you can transform ordinary eggs into fluffy, bright-yellow chicks that make perfect decorations or gifts.
Use craft feathers, googly eyes, and tiny orange paper beaks to bring your chicks to life, and let the kids add their own unique touches. Whether you’re using real eggs or plastic ones, this craft is easy, mess-friendly, and guaranteed to bring lots of smiles. It’s the perfect activity to do together as a family to make your Easter celebration extra special!
🎨 Supplies Needed

🖌️ How To Make These Easter Egg Crafts

- Step 1: Paint the wooden eggs. You will need to give each egg 2-3 coats of paint. Allow the paint to dry completely.
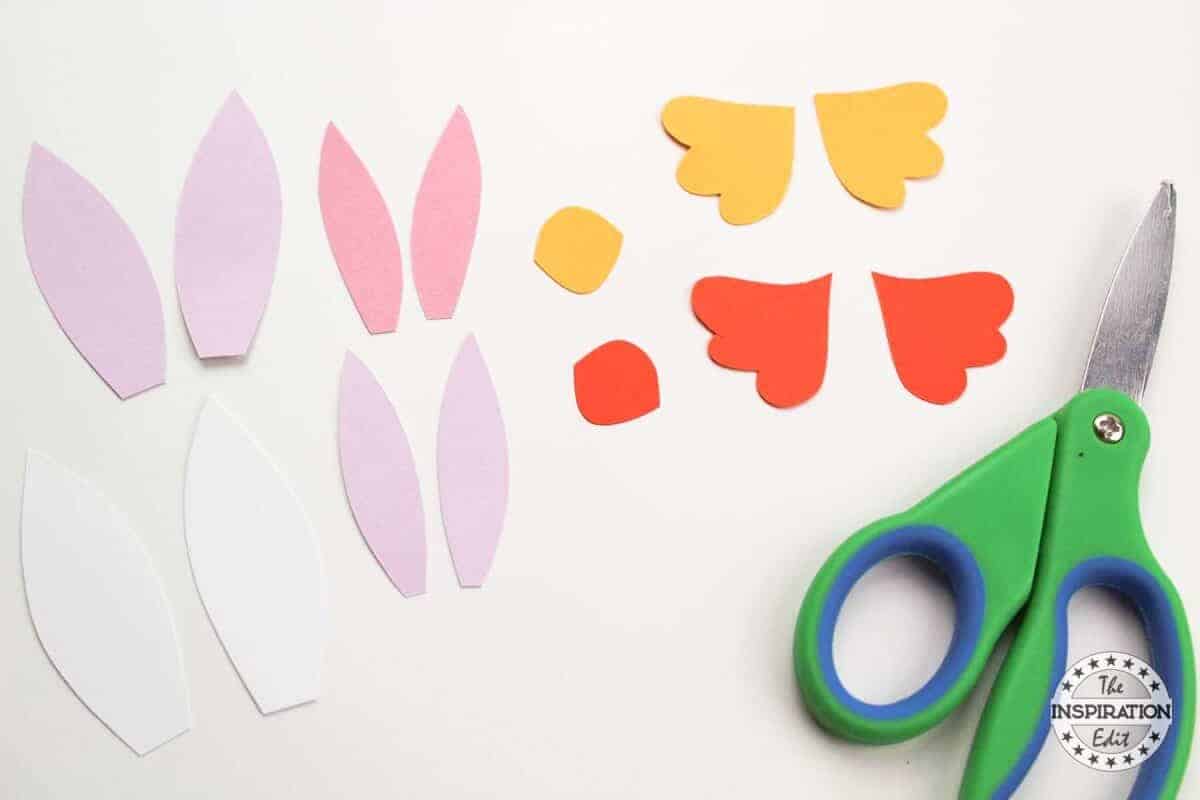
- Step 2: Download the template and print out. Cut the template out and trace onto cardstock.

- Step 3: Cut each piece out. Glue the pieces of the ears together.

- Step 4: Next Glue the wings onto the chicks. Then Glue a tuft of feathers onto their heads. Fold the beak in half and glue it onto the chicks.

- Step 5: Glue the ears on top of the bunnies. Dip your pinky finger into pink paint and add rosy cheeks to the chicks and bunnies.

- Step 6: Use a pencil to draw eyes onto the chicks and bunnies. Once you are satisfied with how they look, trace over them with a black paint pen or black marker.

- Step 7: Draw a mouth and whisker spots onto the bunnies and add dots on top of the chick’s beaks.

- Step 8: Glue the chick’s feet onto the bottom of the eggs. Dip your pinky finger into paint to add pads to the bottom of the bunnies feet. Glue the bunny’s feet onto the bottom of the eggs.
Your eggs are finished!

I absolutely love these eggs and it's so egg-citing!
💡 Pro Tip: Place your decorated egg inside a handmade paper shell that can be cracked open, making it look like the rabbit or chick is hatching right before everyone's eyes.
🧑🎨 Expert Tips
- Design a Nesting Scene: Create a miniature nest using twigs and moss to place your chick and rabbit eggs in, adding a naturalistic touch to your Easter display.
- Incorporate Interactive Elements: Attach small magnets to the bottom of the eggs and a magnetic base to allow the eggs to "hop" or "wobble," making them more engaging for children.
- Use Scented Paints: Mix a few drops of essential oils into your acrylic paints to give the eggs a pleasant aroma, enhancing the sensory experience.
- Create a Storybook Companion: Write a short Easter tale featuring your crafted characters and display it alongside the eggs, encouraging storytelling and reading.
- Add Textured Materials: Incorporate materials like felt, fabric scraps, or yarn to add texture to the ears, wings, or tails, making the eggs more tactile and visually interesting.
- Implement a Color-Changing Feature: Use thermochromic paint that changes color with temperature, adding a magical element to your Easter eggs.
🖌️ More Fun DIYs
Love these crafts! Don't forget to pin them on Pinterest or leave a comment and let us know how you got on!


Did you make this craft? Leave a review and comment below! Alternatively, bookmark it in your browser or save to Pinterest.

DIY Rabbit And Chick Easter Eggs
Materials
- Wooden or Paper Mache Eggs
- Acrylic Paint
- Paintbrush
- Cardstock
- Glue
- Hot Glue
- Pencil
- Black Paint Pen or Permanent Marker
- Scissors
- Feathers
Instructions
- Paint the wooden eggs. You will need to give each egg 2-3 coats of paint. Allow the paint to dry completely.
- Download the template and print out. Cut the template out and trace onto cardstock.
- Cut each piece out. Glue the pieces of the ears together.
- Glue the wings onto the chicks. Glue a tuft of feathers onto their heads. Fold the beak in half and glue onto the chicks.
- Glue the ears on top of the bunnies. Dip your pinky finger into pink paint and add rosy cheeks to the chicks and bunnies.
- Use a pencil to draw eyes onto the chicks and bunnies.
- Once you are satisfied with how they look, trace over them with a black paint pen or black marker.
- Draw a mouth and whisker spots onto the bunnies and add dots on top of the chick’s beaks.
- Glue the chick’s feet onto the bottom of the eggs.
- Dip your pinky finger into the paint to add pads to the bottom of the bunnies feet.
- Glue the bunny’s feet onto the bottom of the eggs. Your eggs are finished!


Leave a Reply