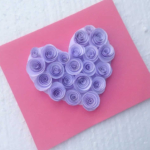
Rose Filled Mothers Day Card
This is a tutorial on how to make a rose filled mother's day card.
Calories:
Equipment
- Scissors
Materials
- Coloured Craft Paper and white craft paper
- Craft Glue
- Pencil – to trace the template
- Template
Instructions
- Take a small piece of colored craft paper and cut it into a spiral as like the spiral template.
- Take the spiral paper and start to roll it from its outer edge.
- Keep rolling the spiral pattern until reaching the centre.
- Apply glue on the centre area of the spiral pattern, which now should be positioned below the rolled pattern.
- Press the roll with the centre to make sure that it is secured and glued with the centre part.
- Similarly make around 20 rolled roses. You can create more if required to fill the heart pattern.
- Prepare the card using any colored card paper other than white.
- Trace and cut out the heart pattern of the template from a white paper.
- Glue the cut out heart pattern on the front side of the card.
- Now start to glue the rolled roses inside the heart pattern on the card.
- Start gluing the roses from the bottom edge of the heart pattern.
- Glue the roses along the border, moving upwards.
- Fill the heart pattern with the craft paper roses neatly. Once done filling the heart with roses, allow the glue to dry for a while.
- Though this step is optional, you can also add a thin border around the sides of the card.
- Take 4 thin strips of colored papers and glue them along the sides of the card.