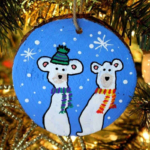
Polar Bear Ornament Finger Print Decorations
This is a tutorial on how to make a polar bear ornament fingerprint decorations.
Calories:
Materials
- Natural Wood Slices
- White Tan & Blue Paint
- Assorted Paint Markers
- Paint Brush
Instructions
- Paint the wood slice blue. (mix in a bit of white to get the shade you want) 1-2 coats. Allow drying completely.
- Dip your children’s fingers into white paint. Help firmly press them down onto the wood slice.
- Allow drying completely.
- Dip your children’s fingertip into the tan paint and press down firmly on the face of the polar bear.
- Dip your children’s fingertip into white paint and press down firmly on the top of the fingerprints to add ears to the polar bear.
- Use a paintbrush to paint on white snowflakes.
- Use the end of a paintbrush or any tool with a round end to add snow.
- Allow the white paint to dry completely. Use black paint pens to draw on a nose and eyes.
- Use paint pens to draw on hats and scarves. Use a pink paint pen to add detail to the ears.
- Use a black paint pen to add detail.
- Your ornaments are finished. These make amazing keepsake gifts.