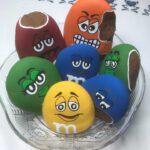
M&M Painted Rocks Tutorial
Yield: 7 Stones
Calories:
Materials
- Rock stones smooth and chipped
- Dotting tool
- Black Posca Pen
- Acrylic Paint – red green, yellow, orange, blue, grey, brown, white
- Pencil
- Paint Brush
- Sealer
- Toothpick Optional
Instructions
- Find the right shaped rock, paint a base coat to prep the stone for light colours. Red, yellow and orange all benefit from having a base coat.
- Paint at least 2 coats of colour.
- Use a dotting tool to apply white candy shell to the edge of any broken part. You can also use a brush or even a toothpick could work.
- Use a brush to apply the milk chocolate color inside the white area trying to leave only a thin layer of white showing.
- Using your brush, dotter or toothpick, paint in the white areas of the eyes, the letter m and any teeth.
- Using a paint pen, brush, dotter, or marker use black to outline the eye area and the mouth. If the mouth is open colour the inside black.
- Add a black dot for the eyeball and to add any eyebrows.
- Use a dotter or brush with red paint to make a tongue.
- Once you are done with final touch-ups you are ready to apply sealer.All done and ready to display!