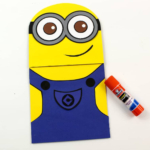
Minions Puppet Craft
If you're looking for a fun paper craft for the kids, this minion puppet craft is the best!
Calories:
Materials
- Glue stick or school glue
- Scissors
- Paper bag
- Black marker
- Black string or embroidery floss
- Tape
- Colored paper or construction paper red, yellow, black, white, blue, and brown
- Free paper bag minion craft template
Instructions
- Start by downloading the minion craft template PDF file
- Print the PDF on the right colored paper. Follow the instructions at the bottom of each of the page of this template file and use this photo below to make sure you are using all of the shapes and colors properly.
- Cut out all of the pieces from the printed paper. Glue the yellow minion body and head to the bag. Make sure that the rounded head piece is attached to the flap while the body (rectangle) is attached to the main part of your brown paper lunch bag.
- Glue on the overalls. Trim the bottom of the overall and paper bag to match the height of your minion, depending on which one you're making.
- Attach the pocket to the top of the outfit. Glue two small black buttons to the overalls' shoulder straps and the last black circle in the pocket's middle. Use a black marker to draw your logo on the pocket.
- Horizontal secure the black strip over the head. Glue the pupils to the eye cutouts, then both to the goggle cutouts. The goggles should be glued to the strap of the head cutout. Kevin and Stuart's goggles overlap by a little bit.
- Glue the eyelids to the eyes, matching the curve to the inside of the goggles. You may simply draw a smile on Kevin's face with a black marker, but we decided to cut his mouth out of black paper, teeth from white paper, and tongue from red paper. This makes Kevin seem irritated.
- For Kevin and Stuart, cut short, varying sized pieces of black string to make silly hair. However, Bob has no hair so you don't need to worry about this for bob. Tape the hair pieces to the back of the head (glue doesn’t hold as well). Kevin's hair stands up while Stuart's hair falls down to the sides.
- Use the sticky thing to attach the eyes. Make sure that when you close your minion's mouth, their eyelids are touching too because it looks funny otherwise!