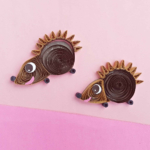
Easy Hedgehog Quilling Craft
This is a tutorial for making a hedgehog quilling craft.
Calories:
Materials
- Quilling Paper Strips
- Craft Paper White, Pink, Grey
- Black Sharpie
- Craft Glue
- Slotted Quilling Tool
- Scissors
Instructions
- Take 20 inches and 18 inches long quilling strips. Prepare loose coil patterns with them. I used a dark brown 20 inch strip for the hedgehog’s body and light brown 18 inches strip for the hedgehog’s head.
- Press the light brown loose coil slightly on any side to create a pointy edge.
- Press the light brown loose coil on 2 more points at the opposite side of the first point.
- Use 2 inches light brown strips to create triangle shapes. These will be the spikes of the hedgehog. Make as many as you need.
- Use 4 inches black coloured quilling strips to create 3 tight coils. These will be the legs (2) and the nose (1) of the hedgehog.
- As the hedgehog is 2 dimensional and shows only one side we will need to prepare only 1 eye and the mouth pattern for it. Cut out 1 round shape from white craft paper and a mouth pattern from pink craft paper; sizes of both items should be appropriate to the size of the hedgehog’s body.
- On a dark colored craft paper glue the big loose coil (the body) and the shape (the head) prepared in step 3. Both quilled pieces should be adjacent to each other.
- Now carefully cut the craft paper tracing around the quilled parts.
- Start to glue the spikes from the top side of the body part. Attach as many spikes as you want.
- Attach as many spikes as you want.
- Finally glue the eyes and the mouth pattern on the head part of the hedgehog. Also attach the legs and the nose. Allow the glue to dry completely.