DIY Beaded Bracelet Jewellery Craft For Kids
The DIY Beaded Bracelet Jewellery Craft for Kids combines fun beads, elastic cord, and creative flair into a hands-on piece of wearable art.
Calories:
Materials
- Coloured Wooden Beads Square or round depending on your choice
- Oval Wooden Beads Color of your choice
- Elastic Thread
- Scissors
Instructions
- Take a long piece of elastic thread (taking a long piece is better because adding extra thread later is difficult).
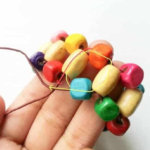
- Insert a square or round bead (I’m using square) then one oval bead followed by another square or round bead.
- Take the open ends of the thread and insert another oval bead through both ends, from both sides.
- Pull the open ends of the thread and bring the 4th bead closer to the first 3 beads.
- The thread has 2 ends, so we are going to insert 1 square bead through each open ends.
- Now insert an oval bead through both sides and pull the open ends of the thread to bring the oval bead closer to the previous beads.
- Continue to do the same until reaching the required length for your bracelet.
- Once the beading will reach the required length you can stop beading.
- The beaded thread has one closed end and the other side has 2 open ends.
- Bring the closed and the open sides together.
- The first bead of the closed end should be an oval bead; insert the open ends of the thread from the other side through the oval bead from both sides.
- Notice the red and yellow curved lines to be clear about how to insert the open ends of the thread through the oval bead.
- Now you can insert a small length of the remaining thread ends randomly through the adjacent beads.
- I pulled one end of the thread through the next 3 beads in a loop which brought the thread near the other end of the thread. Notice the yellow and red curved lines t have a clear idea.
- Now that both ends of the thread are next to each other you can simply tie 2 tight knots and cut off extra thread.
- You can pick different sized, shaped and coloured beads for variation.