Conversation Rock Art Project For Kids
Calories:
Materials
- Rocks
- Pencil with eraser
- Pens
- Paint
- Paintbrushes
- Sealant
- Glue
- Any fun decor that you’re gluing
Instructions
- Make sure your rocks are clean and free of debris.
- You may choose to prime your rocks with a paint primer. We chose white.
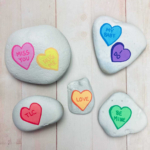
- With a pencil, trace out the shapes of the hearts on the rocks. You can add more than one if your rock is large enough.
- Color the hearts in light, bright colors. The lighter colors should be the “main” color of the hearts. The darker colors will be used to highlight.
- Use complementing darker colors to outline the hearts. For example, if you colored a heart in light blue, use dark blue to outline the heart. Make one side a little thicker so it looks more three-dimensional.
- With the same darker color, write a phrase in the middle of the heart.
- Spray with sealant to complete the rocks. Easy as pie!
Notes
- Rocks can be found outside but should not be taken from protected natural areas.
- If you are having trouble finding rocks, you can always purchase them on Amazon, a local garden center, or at a local landscaping company. They will usually sell them by the bucket-full.
- We do not recommend purchasing the smooth stones/river rocks from craft stores. They come with a coating on them and your paint/pen will not stick very well.
- Make sure your rocks are clean and free of debris before starting your art.
- If you need, you can lightly trace your design with a pencil first.
- If you plan on painting, acrylic paint works best.
- If you plan on using pen for your art, you can use paint markers (we suggest the Posca, Artistro, and Tooli-Art brands), artist pens, gelly roll pens, markers, highlighters, etc.
- If you’d like to glue anything to your rocks, we recommend the E6000 brand. (Note: it is important to seal your rock with sealant prior to gluing items!)
- We also recommend sealing your rocks after you’ve finished decorating them. You can use whatever finish you’d like (glossy, matte, etc). These can be found online or in your local craft stores. Our suggestions: Rust-oleum and Krylon brands.
- Rock art is relaxing and fun. Let your imagination run wild!