Unicorn Pictures Quilling Project For Kids
This is a tutorial on how to make a unicorn pictures quilling
Calories:
Equipment
- Scissors
Materials
- Quilling paper strips
- Craft paper – black cream and pink
- Craft glue
- Slotted quilling tool
Instructions
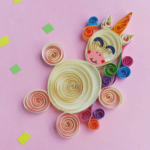
- Select a colour for the unicorn, I chose cream coloured quilling strips.
- Take 6 quilling strips of the following sizes – one 20 inches, one 12 inches and four 5 inches strips.
- Prepare loose coil patterns with them.
- The big coil will be the body, medium coil will be the head and the 4 small coils will be the legs of the unicorn.
- Use different coloured strips (1.5 – 2 inches) to create curled pieces for the hair and the tail of the unicorn.
- Simply coil the strips by keeping one end of the strips open.
- Use cream quilling strips (2 inches) to create two triangle shapes (the ears) and a different coloured (for the horn) strip to create a stretched triangle shape.
- Cut out a lens shape (mouth) from pink craft paper and 2 closed eye patterns from black craft paper.
- Prepare a small piece of cream coloured craft paper.
- Take the big and the medium loose coils and glue them on the paper, placing both coils adjacent to each other.
- Use scissors to cut the paper by tracing around the glued coils.
- Now take the 4 small loose coils; glue 2 of them at the bottom side of the large coil, and the others on both sides of it.
- Carefully and neatly attach the mouth (lens shape) and the eye patterns on the head part.
- Attach the ears and the horn on the top end of the head.
- This is the best and fun part! Attach the curled strips with one end open and attach them on any one side of the head, near the ear and attaching the pieces towards the body of the unicorn.
- Use the curled pieces to create the tail as well.
- Once you are done with the unicorn pattern allow the glue to dry.
- Done!