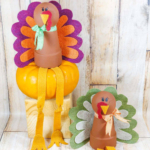
Thanksgiving Clay Pot Turkeys
This is a tutorial on how to make Thanksgiving Clay Pot Turkeys.
Yield: 4
Calories:
Equipment
- Paint Brush
- Scissors
- Ruler
- Glue Gun & Glue Sticks
- Pencil
- Permanent Marker
- White Gel Pen
- Straight Pins
Materials
- Download Patterns
- 4 Clay PotsAcrylic Craft Paint Milk Chocolate
- Craft Felt Burgundy, Prickly Purple, Sandstone, Olive, Pumpkin, Gold
- 2 ½ Wooden Ball Knobs
- Ribbon Gingham Green and Orange
Instructions
- Gather all the supplies needed. Start by removing the stickers from the bottom of the clay pots.
- Download, print and cut out all patterns I have provided here.
- Basecoat the clay pots and wooden ball knobs with acrylic craft paint and allow to dry.
- You can always apply a second coat of paint if you feel that it is necessary. PRO TIP: To speed up the painting and drying process, place the ball knobs on a paintbrush handle so the entire surface can be painted at once.
- Once your pots are dry, attach the head to the body with your hot glue gun.
- Trace the beak patterns on gold felt and the waddle patterns on burgundy felt and then cut them out.
- Attach these cut-outs to the turkey head with your hot glue gun.
- Draw on the eyes and eyebrows with a black permanent marker and then add highlights with the white gel pen.
- Pin the large and small turkey feather patterns onto the craft felt (Prickly Purple, Sandstone, Olive, Pumpkin) with the straight pins and then cut these out. Tracing and cutting will also work for this step.
- Layer the small turkey feathers on top of the large turkey feathers and attach them with the hot glue gun.
- Measure and cut four turkey legs 12” long by 1” wide using your gold felt and then knot each leg loosely in the centre.
- Trace and cut out four turkey feet and attach to the bottom of each leg with the hot glue gun.
- Adhere the layered feathers to the back of the turkey body with hot glue at the base.
- Attach the felt legs to the inside bottom center of the turkey body with hot glue.
- Measure a 12” length of gingham ribbon and tie in a bow around the turkey’s neck. Trim ends into a fishtail by cutting a small triangle out of each end.