Snowman Ornaments for Christmas
This is a tutorial on how to make a snowman ornaments for Christmas.
Calories:
Materials
- Wooden slice
- Teal paint
- Paint brush
- White and different color paints
- Black Posca pen
- White Posca pen
- Rustic string
Instructions
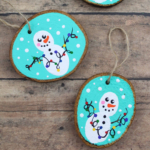
- The first step to create this super cute Snowman Christmas craft is to paint the base of your wooden slice in the teal paint. You are free to choose another color if you prefer but we chose teal as it gave a great effect.
- Then, leave your Christmas ornaments to dry for a few minutes.
- Next, you are ready to paint a snowman onto your wooden slice ornament. Paint a body and a smaller sized head. You can use a paint brush.
- If you’re making these decorations as Christmas gifts in preschool or kindergarten, you might want to get the kids to use their finger and thumb prints for the snowman’s body and head!
- That would make a more personalized decoration and add a fun sensory play aspect to this kids Christmas craft project.
- Once again set the wooden slice to the side until the snowman is dry.
- After the snowman is completely dry you can use different color pens to add dots for baubles and join these together with your black Posca paint pen.
- Next, add eyes, a nose, a mouth, and a rosy pink cheeks to your snowman. Then add two black buttons.
- Finally, you can add snow by dropping small white dots onto the background. This is really effective and will make the Christmas Snowman decoration pop!
- Finally, you will want to add a rustic looking string to your wooden slice so you can hang the decoration at home or on your Christmas tree.