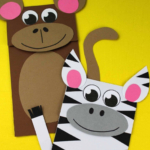
Paper Bag Zebra Craft Preschool Kids Will Love
This is a tutorial on how to make a paper bag zebra.
Calories:
Equipment
- Scissors
Materials
- Construction Paper
- Brown Paper Bag
- Glue Stick
- Zebra Puppet Pattern
- Black Marker
Instructions
- Download and print out the Zebra puppet template.
- Cut the template out. You will need to print the template once for each Zebra you make.
- Cut large squares of card stock or construction paper and glue onto the cardboard.
- You want to glue on the side that the square bottom flaps up.
- Use scissors to trim off any excess paper from the sides.
- Trace the Zebra hoof template onto paper and cut out.
- Glue the hoofs onto the Paper bag.
- Trace the triangle templates onto black paper, cut out, and glue onto the front of the paper bag.
- race the ears onto paper, cut out, glue together and glue onto the front of the paper bag.
- Trace the mouth onto paper and glue onto the front of the paper bag. Use a sharpie o add detail.
- Cut a strip of paper and glue onto the back of the paper bag. This is the zebra tail.
- Cut a small piece of paper and cut small slits into it and glue onto the end of the tail.
- Cut the eyes out and glue onto the front of the zebra.