Minnie Mouse Oreo Cookies Tutorial
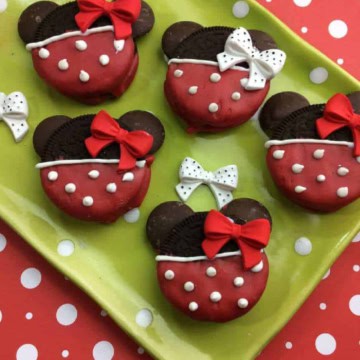
Minnie Mouse Oreo Cookies tutorial creates adorable Minnie-inspired treats by dipping Oreos in red candy melt, adding white polka dots, and topping with a royal icing bow.
Equipment
- Wax Paper
- Cookie Sheet
- 2 Small Pots
- Tooth Picks
Ingredients
- 1 Package Double Stuffed Oreos
- 1 Bag Chocolate Buttons
- 1 Bag Red Candy Melts
- ¼ Bag White Candy Melts
- 1 Package Royal Icing Cupcake Decoration Bows
Instructions
- Gently tear apart the Oreos so that you have one half clean of filling and the filling is on the other half.
- Take one of the chocolate buttons and place the bottom edge of the button on either side of the Oreo.
- Pour the red candy melts into a microwave container and melt as per the instructions on the packaging.
- Using a toothpick or chopstick, dip the stick into the red candy melts and then drop some of the candy melt onto the edge of the chocolate button to create a glue.
- Place the cookies back together, and the chocolate should hold the Oreo back in place.
- Dip the cookies half way into the red candy melt and then place on the wax paper.
- Set the Oreos to one side to cool and harden. Once the red chocolate covering has hardened add in a few white wafers to another pot and microwave until melted.
- Once melted, scoop the white chocolate into a zip lock bag, cut a tiny tip from the corner or the bag and pipe white chocolate as a line along the edge of the red chocolate.
- Next, add white polka dots. Now all you need to do is take the icing bow, add a few dots of chocolate to make glue and place the bow on the cookie as shown below.
- Let the white chocolate harden in the fridge for about 20 minutes. Enjoy!
Notes
- Gently separate Double Stuf Oreos, keeping the filling on one half. Attach Mini Oreo cookies to the filling side of the larger Oreo using melted white chocolate to form Minnie’s ears.
- Dip the assembled cookies halfway into melted red candy melts and let them set. Once hardened, pipe white chocolate along the red border and add white polka dots for a classic Minnie look.
- Use royal icing bows or make your own with fondant, then secure them to the top of each cookie with a dab of melted white chocolate.
Nutrition
Calories: 240kcalCarbohydrates: 35gProtein: 2gFat: 11gSaturated Fat: 5gPolyunsaturated Fat: 1gMonounsaturated Fat: 4gTrans Fat: 0.02gSodium: 160mgPotassium: 88mgFiber: 1gSugar: 23gVitamin A: 1IUCalcium: 8mgIron: 5mg
Tried this recipe?Let us know how it was!