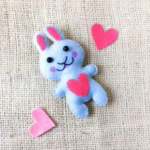
Easy Sewing Projects for Beginners Felt Bunny
Sew up some cuteness with this Easy Felt Bunny project for beginners.
Calories:
Materials
- Felt 2 Different Colors
- Scissors
- Bunny Template
- Gel Pen or Tailor Chalk
- Needle And Thread
- Small Black Beads
- Pink Highlighter Optional
Instructions
- Print and then cut out the patterns from the template. Use a light coloured felt fabric for the 2 pieces of the body part; and a different, bright coloured felt fabric for the ears and belly (heart) pattern.
- Place the main body pattern of the template on the selected felt and carefully trace around the sides of it on the felt. You’ll need 2 of these.
- Take the bright coloured felt and trace the ears and belly pattern on it carefully.
- Use scissors to cut out the traced felt pieces and prepare needle and thread.
- Take any one of the felt pieces cut out for the main body. Stitch the heart belly and ears with this part as it’ll be the front side of the bunny. Work with flat blanket stitch or running stitch to attach them.
- Once you’re done stitching the ears and belly parts use a gel pen to mark the points for eyes and other face details.
- Use black thread and a needle to stitch the face details of the bunny onto the felt. Make sure that the stitching is neat and even.
- Select 2 small black beads for the eyes and use black beads to stitch them on the points marked for the eyes of the bunny. You can also glue the eyes, but it’s better to stitch.
- Done adding all the details for the front side of the bunny? Time to craft the plushie! Take the other felt piece for the main body part.
- Place both body pieces together, with the patterned piece facing up. Stitch around the sides to join both pieces.
- Start stitching either from the bottom part or the top part. But do not stitch all around; go to the next step for further instruction.
- Keep an opening on any one side for stuffing the bunny. Use a pointy object, such as pen or tip of paint brush to push the stuffing through the tiny legs and eras of the bunny.
- Once the bunny is fluffy is enough you can stop stuffing and prepare needle and thread to stitch the open end.
- Stitch the open end nicely. You can attach a ribbon loop through the open end before closing it if you want to make a key fob or charm, but it’s optional.