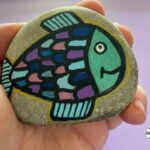
Easy Fish Rock Painting Tutorial
Turn plain stones into colorful fish with this simple rock painting craft.
Calories:
Materials
- Posca Pens
- Rock Stones
- Pencil
Instructions
- Lightly sketch the basic fish shape on your rock using a pencil. Focus on outlining the head, body, and tail, keeping your lines simple so you can adjust them as needed.
- Add overlapping scales along the body for texture, then begin filling in the main section with a bold color—here, a bright green—to make your fish pop.
- Begin filling in the fish scales with a mix of bright colors. Alternate your shades to create a lively pattern, and let each layer dry before moving on.
- Continue coloring the remaining scales, experimenting with different hues to add contrast and depth. Be sure to keep the edges defined for a crisp, eye-catching design.
- Use a metallic or gold paint pen to outline sections of the fish and add a subtle shimmer. This extra detail highlights each scale and ties the colors together.
- Go over the fish’s edges and key features with a black paint marker to define the shape. This final outline makes the design pop and gives it a clean, polished finish.
- Fill in the fish’s face with your chosen color and add any finishing details, like extra highlights or subtle shading around the scales, to bring out the design’s depth.
- Draw in the eye with a paint pen or marker, and add a small white dot for a lively sparkle. Once everything is dry, seal your rock if desired to protect your new fish friend for the long haul!