DIY Yarn Letters
DIY MEOW Yarn Letters let kids wrap colorful yarn around wooden letters to create cozy, personalized decor.”
Calories:
Materials
- Colored Yarn Purple, white, pink, and teal
- 5.5 Inches Wooden Letters M, E, O, and W
- Tape
- Paint Purple, white, pink, and teal
- Scissors
Instructions
- To get started, tape the end of the string to the back of one of the wooden letters. For extra tight coverage, pinch the tape to the string as you place it on the letter.
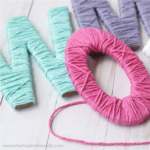
- Start wrapping the string in the color of your choice around the letter, making sure to wrap them very tightly next to each other so that no wood shows. This starts the base where you will layer more string over the top.
- To create more depth and character, crisscross the string to make X shapes and double up on layers as you wrap the string. Make sure you are pulling the string nice and tight at all times throughout the process to ensure it will stay in place.
- As you start wrapping, you’ll notice that curves and corners can be a bit tricky and require lots of extra layers and overlapping. Don’t worry about messing anything up – you can always crisscross to a different area and make it more even to your liking. This project is very forgiving!
- The letter O may require a few long pieces of string since you need to wrap around and through the inside of the letter to get to the other side. It’s important to note that a ball of yarn will not fit through the wooden letter as you wrap it around. Instead, tape the end of a piece of string down and then tape the beginning of a new string right over the same area on the back.
- Once you’re done, tape down the end of the final string to the back, as this will not show. If you plan to display letters in a way that it does show, you might want to use hot glue instead.
- Paint the edges of the wooden letter the same color as the string, if desired. This is not completely necessary but does look nice in the offchance the ends become visible.
- Repeat this process for each of your letters and then display for your cat birthday party!