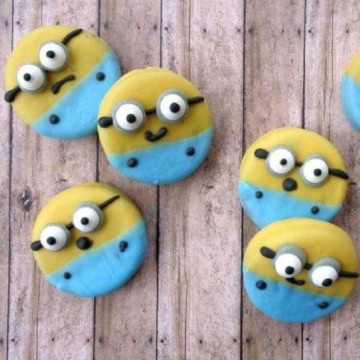
Despicable Me Minions Themed Oreo Cookies
Despicable Me Minions-Themed Oreo Cookies use yellow, blue, and black candy melts to transform Oreos into playful Minion faces with candy eyes.
Equipment
- Decorating Bags or Ziploc Bags
- Candy Melts Decorating Tips
Ingredients
- Oreos
- Candy Melts Black, Yellow and Blue
- Candy Eyeballs
- Candy Melts E-Z Thin
Instructions
- Open the box of Oreos and unwrap them. Set aside.
- Pour the yellow candy melts into a small measuring cup or bowl. Follow the package directions for melting.
- Use E-Z Thin to thin out the candy melts or a bit of Crisco. Add a small amount at a time. You want your candy melts to be a consistency that you can dip your Oreos into.
- Dip one end of your Oreo into the melted yellow candy melts. You’ll want to coat a little more than half the Oreo.
- Pull the Oreo out of the candy melts and allow some of the excess to drip off.
- Place the Oreo on a wire cooling rack. After the excess has dripped off, move to a sheet of wax paper to dry.
- Repeat step 2 with the blue candy melts.
- Dip the other end of your Oreo into the melted blue candy melts. You’ll want to coat about ⅓ of the cookie.
- Pull the Oreo out of the candy melts and allow some of the excess to drip off. Place the Oreo on a wire cooling rack. After the excess has dripped off, move to a sheet of wax paper to dry.
- Repeat step 2 with the black candy melts.
- Pour the black candy melts into a decorating bag or ziplock bag with the smallest candy melts decorating tip attached.
- Pipe black lines onto your Minion.
- If you would like to add grey to the goggles, you’ll need to add white candy melts to another batch of black candy melts and prepare a second decorating bag.
- Pipe circles of black (or grey if you make a batch) onto the black lines. While the candy melts are still wet, add the candy eyes.
- Pipe on some fun faces with the black candy melts and add buttons onto their overalls.
- You can also add some hair to have fun with these and let your little ones help. Enjoy!
Notes
- Dip Oreos into yellow, blue, and black candy melts to create the Minions' signature colors.
- Use candy eyeballs or white chocolate chips with dark chocolate dots for the eyes.
- Pipe black lines with candy melts to form the Minions' goggles and mouth.
Tried this recipe?Let us know how it was!