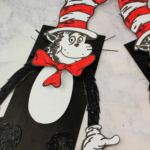
Cat In The Hat Puppet
This is a tutorial on how to make a cat in the hat puppet
Calories:
Equipment
- Scissors
- Xacto Knife
Materials
- White & Black Cardstock
- Black Paper Bags
- Glue
- Crayons
Instructions
- Download and print the Cat and the Hat template.
- Invite your littles ones to colour in the template with traditional colours or let them give it their own artistic touch.
- Cut out each piece of the template.
- An adult must do this step! Use an xacto knife to create a slit in the top hat. (refer to the photo)
- Slip the Cat’s head into the hat and glue in place.
- Glue the head onto the black paper bag. (make sure to glue the head onto the bottom of the bag, the part that flaps up)
- Cut a white oval from cardstock and glue onto the black paper bag. (refer to the photo)
- Glue the bow onto the bottom of the Cat’s neck.
- Glue the hands onto the arms and then glue the arms onto the paper bag.
- Glue the legs to the bottom of the paper bag.
- Cut a long thin strip from black cardstock.
- Cut the strip into small pieces and glue onto the cat's face where his whiskers would be.
- Turn the paper bag over and glue the tail into place.
- Your paper bag puppet is complete. Have fun some!