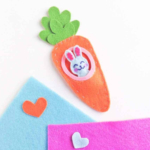
Bunny In The Carrot Sewing Craft For Kids
Your kids will have a great time making this Bunny in the carrot sewing craft. Its a super easy and adorable craft that is perfect for your Easter celebration.
Yield: 1
Calories:
Equipment
- Scissors
- Thread and needle
Materials
- Felt fabric – Green Orange, Blue, Pink
- Craft glue or fabric glue
- Pencil or marker – to trace the template
- Template
Instructions
- 1. Print and cut out the patterns of the template. Place the cut out patterns on the selected felt fabrics and trace around the sides using a pencil or marker. Cut out the patterns neatly.
2. Take the 2 carrot patterns and place the leaves on the top end of the intact carrot pattern; about a cm of both the leaves and the carrot pattern should overlap.
3. Now place the carrot pattern with the hole on the top of the intact one; match the sides of both carrot pattern. Now prepare your needle and thread to stitch all four felt pieces (2 leaves and 2 carrot patterns) together.
4. Cut out the round shape from the template and trace it on a felt fabric. Cut out the pattern and nicely glue it on the carrot pattern with the hole to create a border for the hole. You may also stitch the round border if you want to.
5. Time to craft the felt bunny! Take any one of the bunny body pieces and stitch the face details on it using a dark shaded thread.
6. Once you’re done stitching the face details stitch the inner ear pieces with the body ear part.
7. Now take the other body part and place it under the detailed one. Stitch around the sides of both pieces to join them. Keep a small opening for the stuffing. I used left over felt pieces to stuff the bunny.
8. Once you’ll be done stuffing the felt bunny stitch the open end to secure the stuffing and cut off extra thread. Use a pink highlighter to create pink blush patterns on both cheeks of the felt bunny.
9. Place the felt bunny inside the carrot through the hole and done! Enjoy!