Bat Corner Bookmark for Halloween Reading Fun
This is a tutorial on how to make a bat corner bookmark for Halloween.
Calories:
Equipment
- Scissors
Materials
- Colored craft papers
- Pencil
- Craft glue
- Black sharpie
Instructions
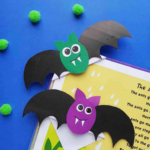
- Select craft papers for the bat bookmarks. I’m using black coloured craft paper for the wings and ears; and purple for the body (oval shape). Trace the template patterns on the selected craft papers and cut them out nicely using scissors.
- Apply a small amount of glue in the middle of the wings pattern and place the oval-shaped cutout ring in the middle of the wings. Press the oval-shaped paper firmly against the glued part of the wings to make sure that they are attached nicely.
- Attach the ears and the eyes of the bat.
- Use a black sharpie to draw a thin curved line for the mouth and then attach the 2 triangular (fangs) cutout papers aligned to the curved line. Make sure to attach the fangs with their pointy ends facing downwards. While the glue dries, grab a square paper (8 inches x 8 inches) and make an origami corner bookmark.
- Attach the paper bat on the triangle side of the origami bookmark. Allow the glue to dry entirely before using the bookmark.
- Your bat corner bookmark is now complete.