Alligator Craft And Paper Bag Puppet For Preschoolers
This is a tutorial on how to make an alligator craft and paper bag puppet
Calories:
Equipment
- Scissors
Materials
- Cardstock Or Construction Paper
- Glue
- Black Marker
- Paper Bags
Instructions
- Download and print out the Alligator template. Having a template is really useful when your unsure how to draw an alligator freehand.
- Next cut the template out. Set aside.
- Glue the green cardstock or construction paper onto the side of the paper bag with a flap.
- Use scissors to trim off any excess paper.
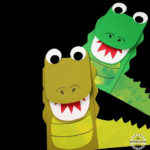
- Trace the template onto cardstock or construction paper and cut the pieces out. (refer to the photo)
- Cut out 2 large circles from white paper and 2 smaller circles from black paper.
- Glue the red paper onto the alligator’s mouth followed by the teeth.
- Glue the eyes together and then glue the eyes onto the alligator’s head.
- Glue the rippled paper onto the sides of the paper bag.
- Glue the oval shape onto the alligator’s body and the head onto the part of the bag that flaps up.
- Use a black marker to add detail to the alligator’s belly. (refer to the photo)
- Flap up the bottom of the paper bag and glue the mouth just underneath.
- Glue the tail onto the back of the paper bag.
- Use a black marker to add nostrils to the alligator’s face.
- Your alligator paper bag puppets are finished!