Cat Head Paper Fan Craft for Your Cat Party
This cat head paper fan craft makes for perfect birthday party decor at a cat birthday party. I’m so excited to share this with you today – it’s easy to assemble and only takes about 20 minutes to make each fan.
I have a full series of various cat birthday party decor that you will love followed by how to throw a kids cat birthday party. You will love all I’ve put together for you so stay tuned for that.
This themed birthday party is sure to be fun for a cat-obsessed child. Kitty cats are pretty cute and can make for a very fun birthday party!

Cat Paper Fan for Decoration
Contents
If you’ve been searching for some birthday party decoration ideas that you can make yourself, this is the perfect option for you. Kids can even help you put these together so you get it done quickly. These are sure to add to the overall theme of the room of cat birthday party decor!
What’s fun is after the birthday party is over, you can hang these on the wall in your room for some fun kids’ bedroom decor as well. There’s no reason to throw them in the trash just because the party is over!
Ready to get started? Scroll down below for step-by-step directions as to how to make a paper fan cat head.
Supplies for Your Cat Paper Fan Craft
For this paper fan craft, you’ll need these supplies:
- Colored paper fans in various sizes – pink, teal, and white
- Colored card stock – pink, teal, white, light pink, and black
- Glue
- Scissors
- Tape
- Double-sided tape
- Pencil
- Circular stencil
- Balloon string
RELATED POST: CAT PAINTING TUTORIAL FOR KIDS

How to Make a Paper Fan Cat Head
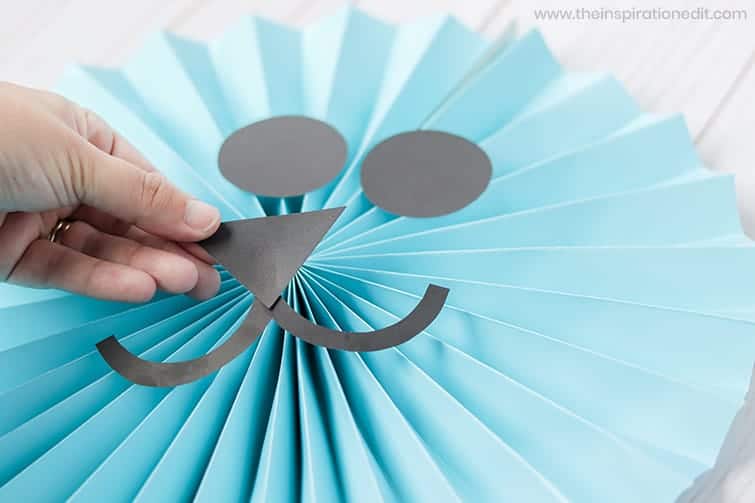
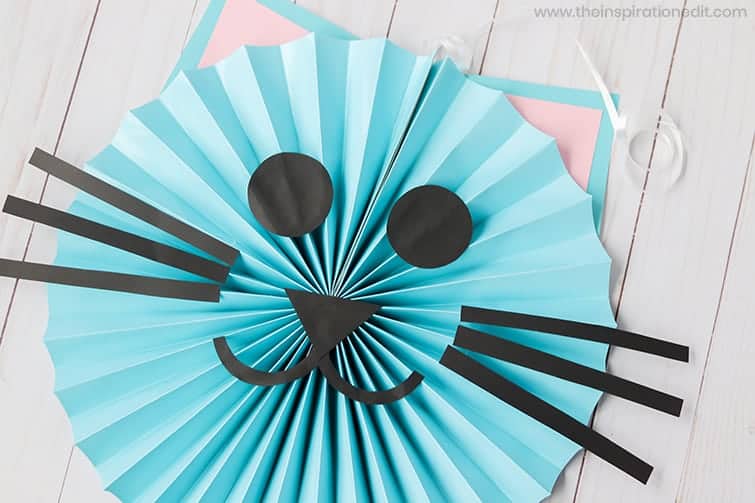
To get started, open the fans according to package directions. Then, trace a circular stencil or object (such as a tape roll) to make eye circles and mouth curves; cut out the shapes. Cut out a small triangle for the nose and 6 long strips of equal length for the whiskers.

Assemble the nose by gluing the mouth curves together followed by gluing the triangle tip down onto the top of the joined mouth curves. Glue the nose, mouth, and eyes onto the paper fan by covering the back of each shape with glue to ensure the glue touches the crimped peaks of the fan.
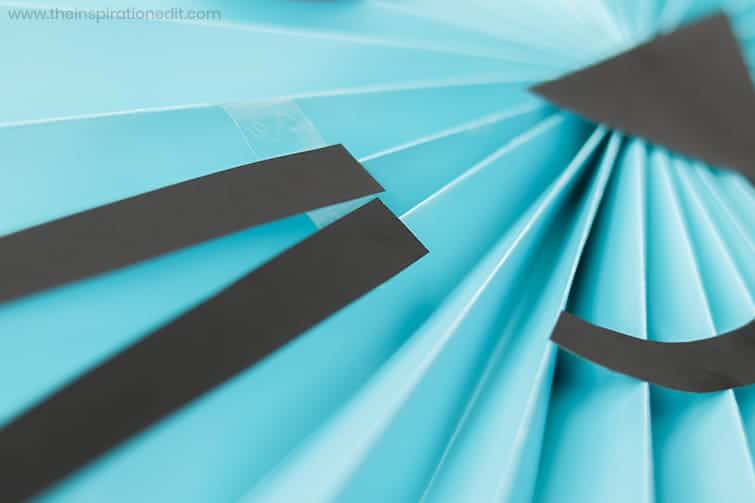
Use the double-sided tape to create a bridge over the crimped peaks of the fan about 3 peaks wide. Then, arrange the whiskers on top of the tape so that the whiskers fan out at angles and stick out slightly from the cat face.
Cut out large triangle shapes from the matching colored cardstock paper and then a slightly smaller triangle from the pink cardstock to fit inside the cat ears. Glue the pink triangle symmetrically inside the colored triangle.

Flip the cat head paper fan over and glue the bottom of the ear triangles to the back of the fan. Apply tape between the crimped peaks and the ears to ensure they don’t fall off and stay securely in place. Tape on the balloon string to the back of the top to hang the cat head paper fans.

Repeat this process for the remaining fans, taking care to match colors and slightly enlarge the shapes for bigger sizes. You’re done!
Cat Head Paper Fan Craft

This is tutorial on how
Materials
- Colored paper fans in various sizes – pink, teal, and white
- Colored card stock – pink, teal, white, light pink, and black
- Glue
- Tape
- Double-sided tape
- Pencil
- Circular stencil
- Balloon string
Tools
- Scissors
Instructions
To get started, open the fans according to package directions. Then, trace a circular stencil or object (such as a tape roll) to make eye circles and mouth curves; cut out the shapes. Cut out a small triangle for the nose and 6 long strips of equal length for the whiskers.
Assemble the nose by gluing the mouth curves together followed by gluing the triangle tip down onto the top of the joined mouth curves. Glue the nose, mouth, and eyes onto the paper fan by covering the back of each shape with glue to ensure the glue touches the crimped peaks of the fan.
Use the double-sided tape to create a bridge over the crimped peaks of the fan about 3 peaks wide. Then, arrange the whiskers on top of the tape so that the whiskers fan out at angles and stick out slightly from the cat face.
Cut out large triangle shapes from the matching colored card stock paper and then a slightly smaller triangle from the pink card stock to fit inside the cat ears. Glue the pink triangle symmetrically inside the colored triangle.
Flip the cat head paper fan over and glue the bottom of the ear triangles to the back of the fan. Apply tape between the crimped peaks and the ears to ensure they don’t fall off and stay securely in place. Tape on the balloon string to the back of the top to hang the cat head paper fans.
Repeat this process for the remaining fans, taking care to match colors and slightly enlarge the shapes for bigger sizes. You’re done!
More Cat Craft Ideas:

Angela Milnes is a Qualified Early Years Teacher who has specialised in Preschool and Kindergarten teaching. She has a wealth of experience teaching young children and is passionate about kids crafts and having fun as a family. Angela has also taught cooking skills and loves to share both family recipes and easy crafts here on The Inspiration Edit. Follow her on Pinterest!


