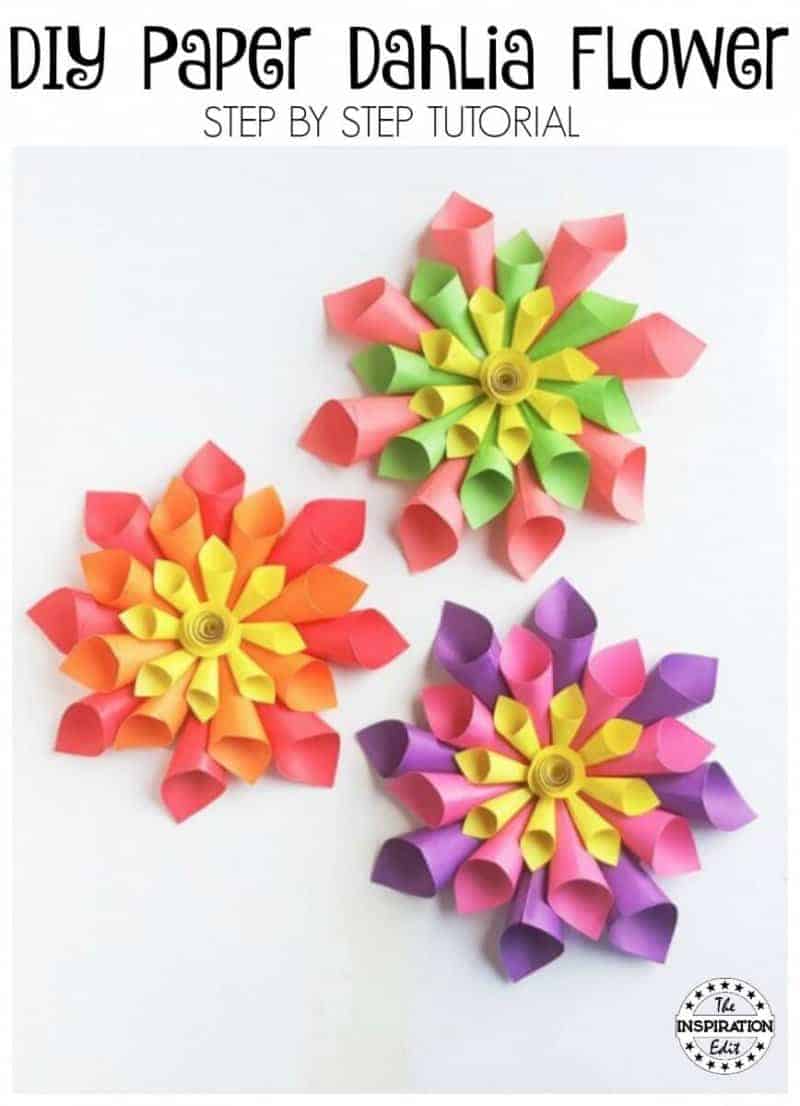
DIY Paper Dahlia Flower Craft for Kids
DIY Paper Dahlia Flower Craft For Kids
Today we are sharing another one of our fun flower craft tutorials which have been a real hit here on The Inspiration Edit.
Paper crafts are easy and simple and can really get the kids really involved in basic creative crafts.
This is a great chance to develop fine motor skills, talk about flowers and the spring season, and get the imagination going.
Supplies for Your Paper Dahlia Craft
Contents
RELATED POST: PAPER CUP FLOWER CRAFT KIDS WILL LOVE

Pacon Card Stock, 8 1/2 inches by 11 inches, Colorful Assortment, 250 Sheets (101199) AmazonBasics Multipurpose Scissors – 3-PackElmer’s E304 Glue (2 Piece)


How to Make a Paper Dahlia

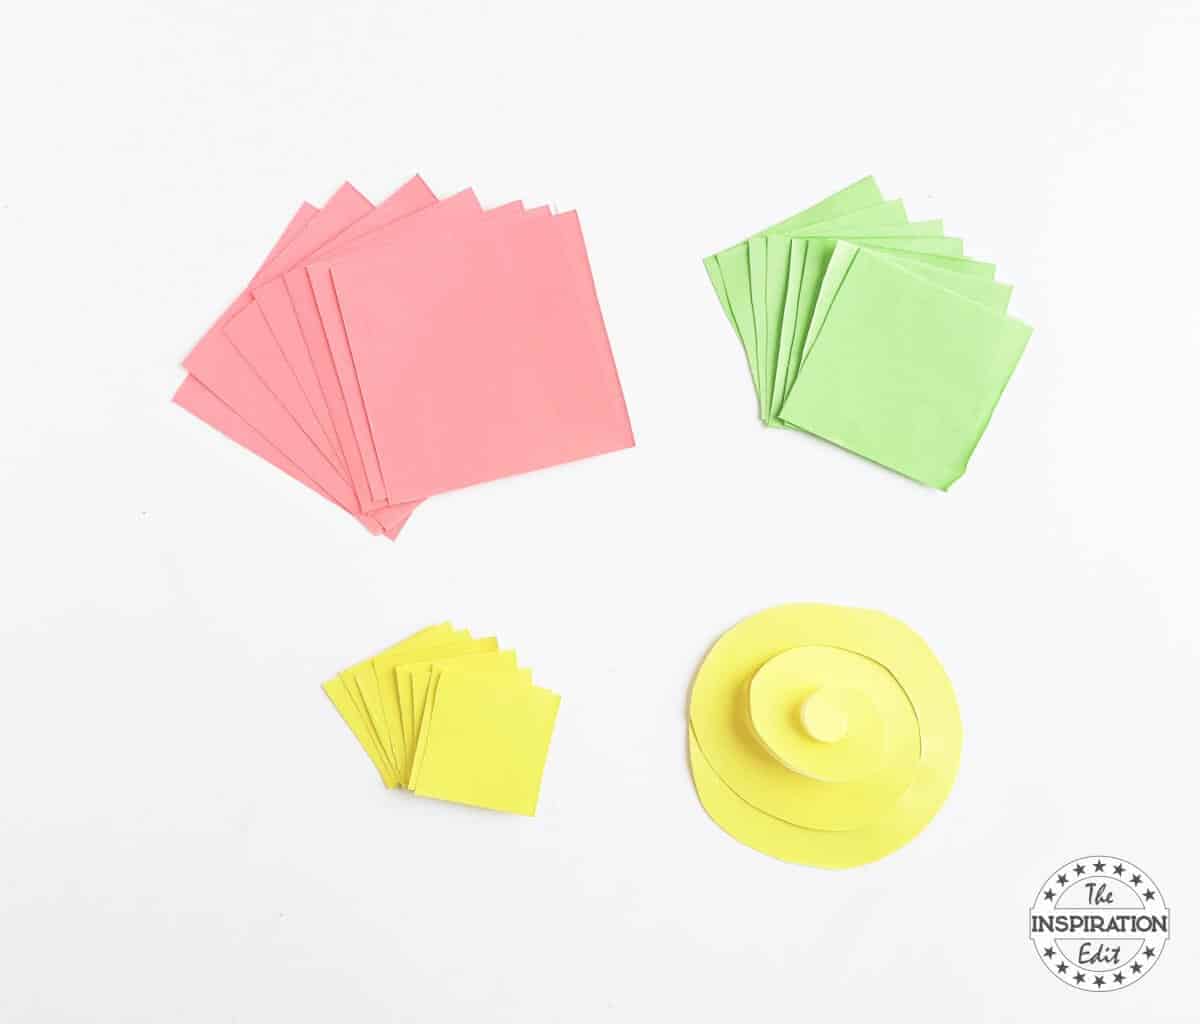
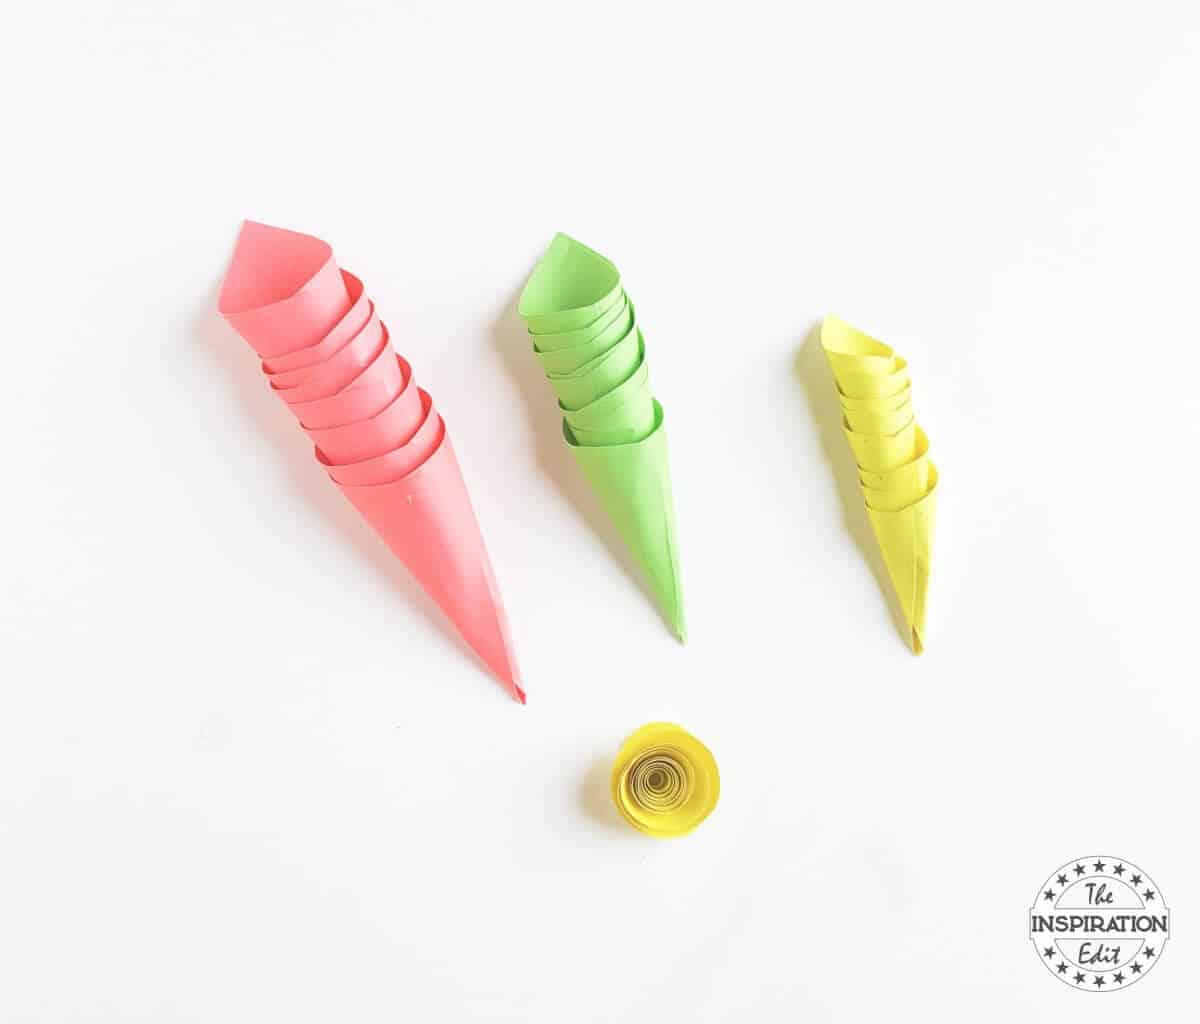
Select 3 or more different coloured craft paper for the flower and cut out square shapes from them.
Cut out the squares in 3 different sizes and for each size cut 8 pieces of squares.
Also cut out a round pattern and then cut it into a spiral.
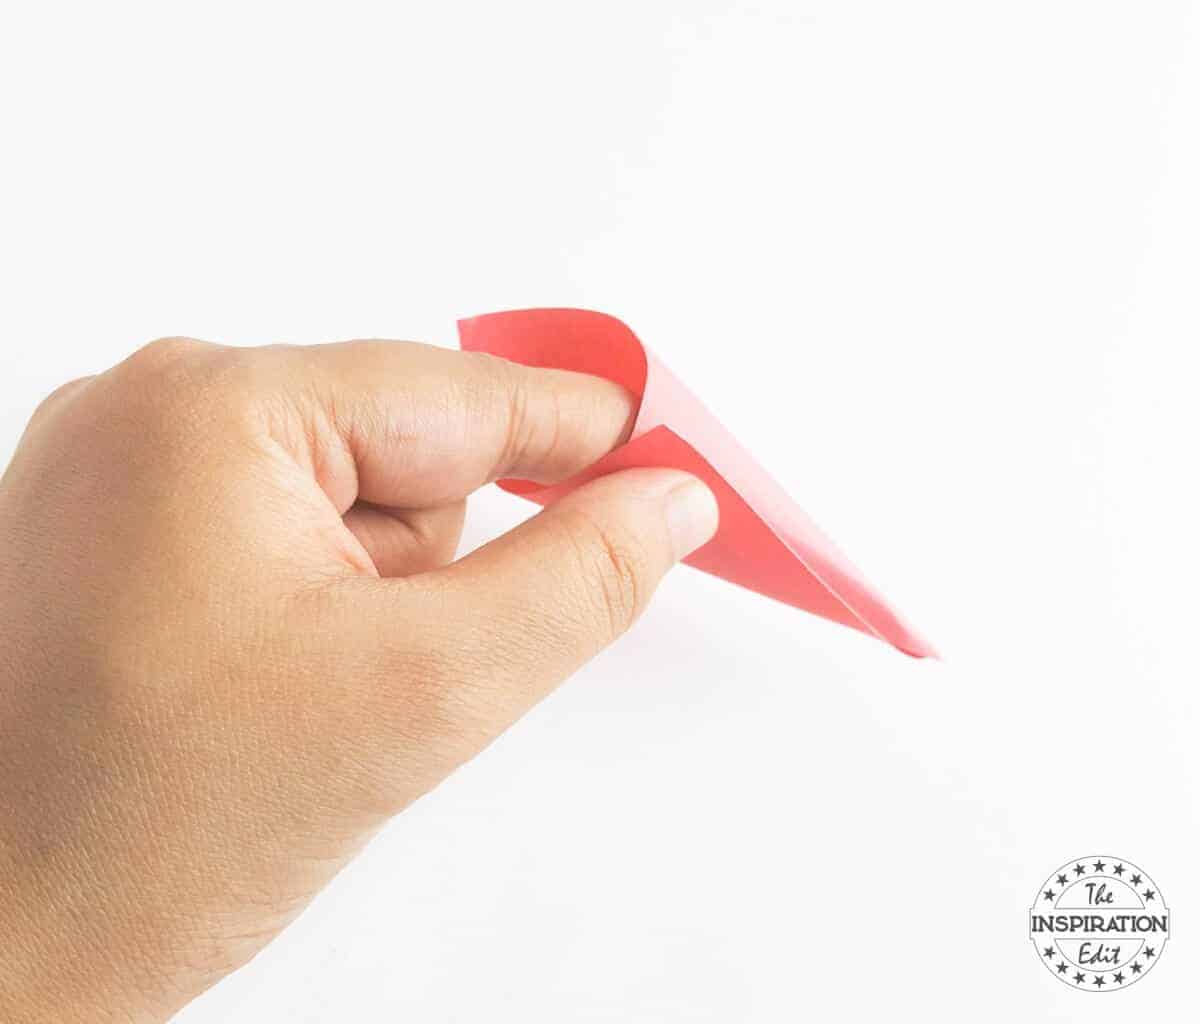
Take any one of the square cut outs and fold any one corner towards the middle of the square.
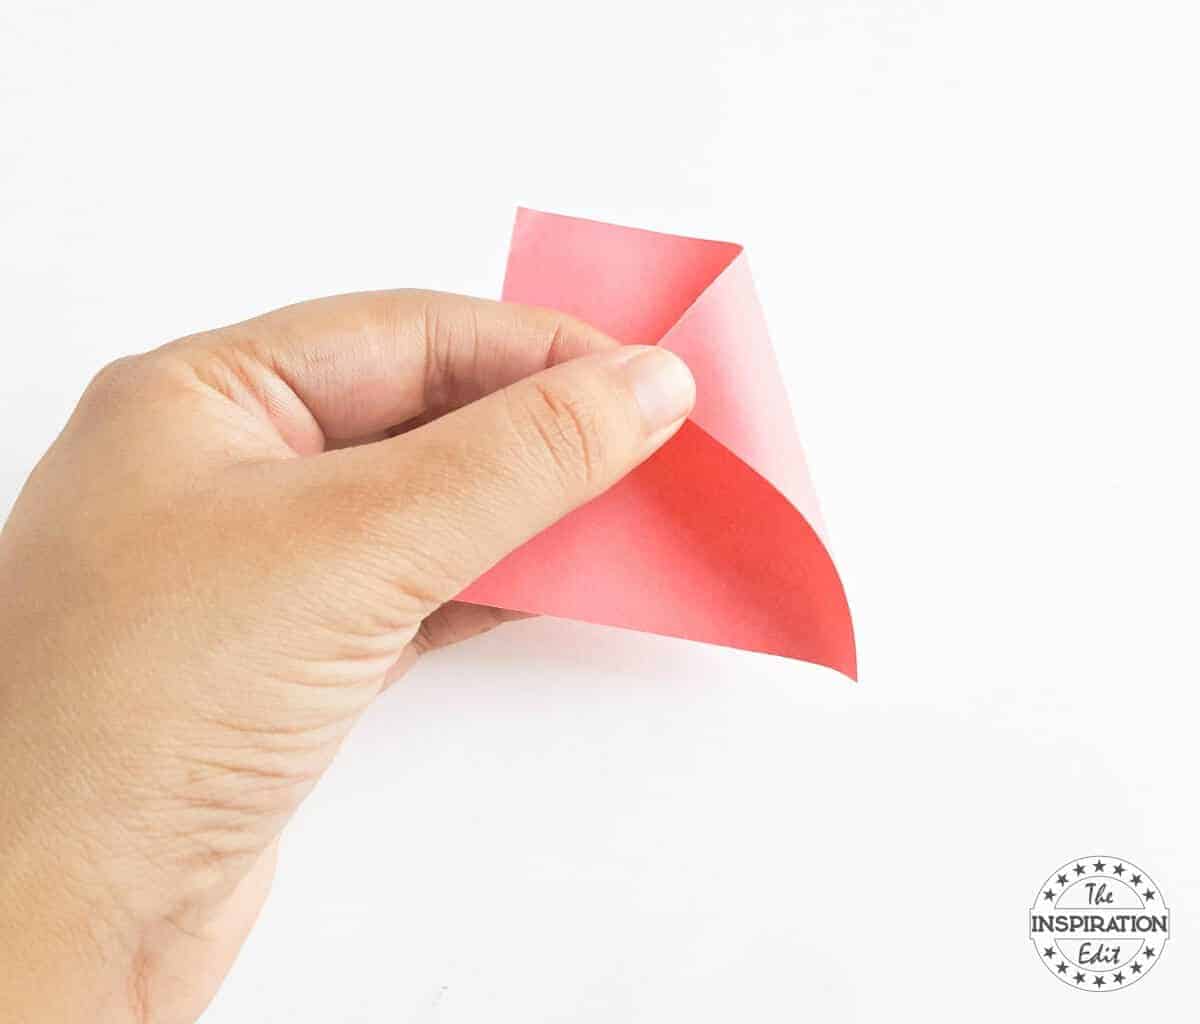
Now fold the opposite corner towards the middle (keeping the previous fold on its place).
Overlap both folds by 1 cm and glue the overlapped part to secure the cone shape.
Similarly create cone patterns with the rest of the square cut outs.
Take the spiral pattern and start rolling it from its outer edge towards the center and then glue the roll with the center to secure it.
This will be the center part of the flower.
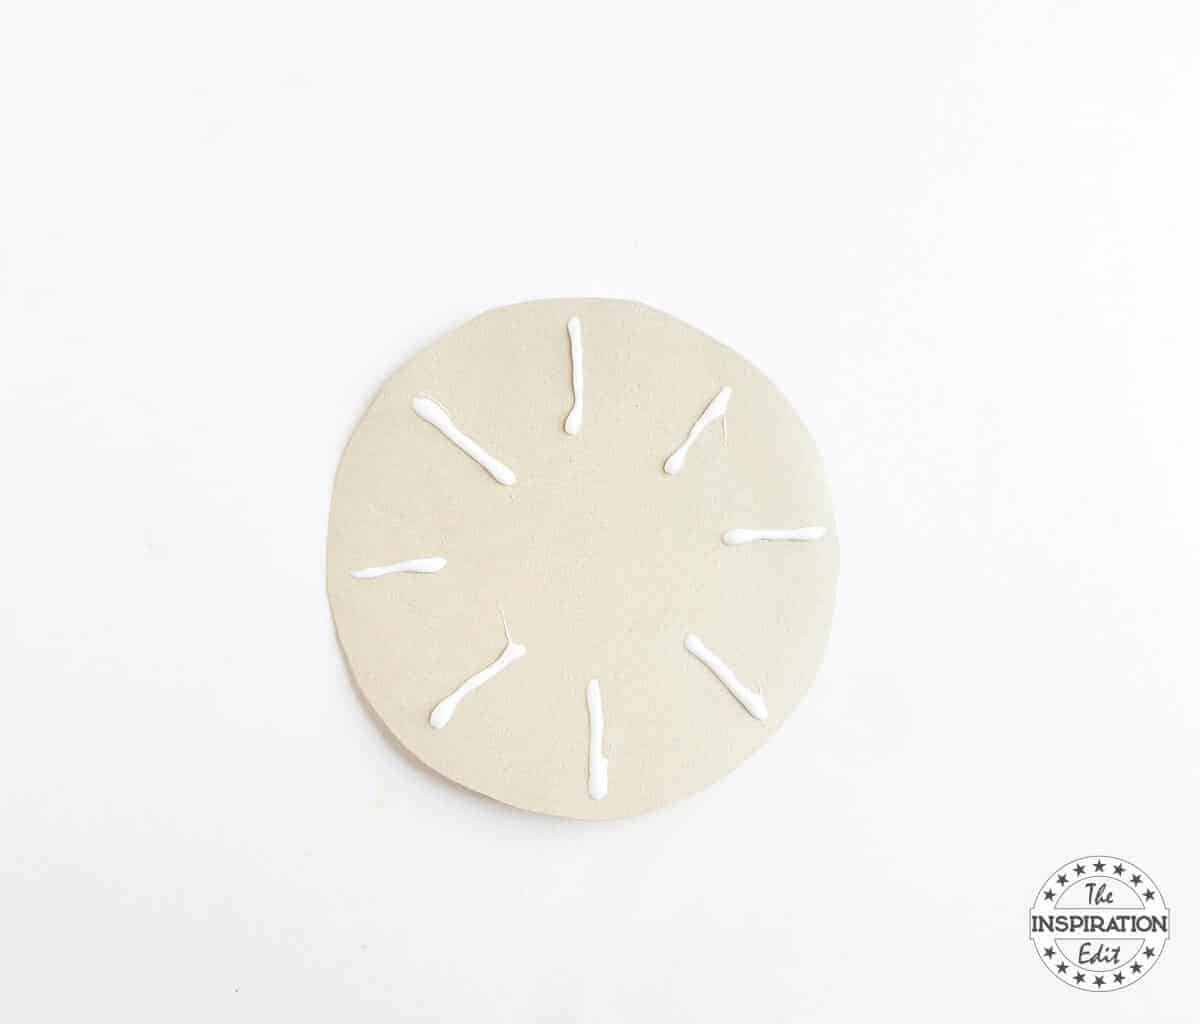
Cut out a round shape from a cardstock paper.
The size of the round cut out would depend on the size of the square cut outs.
Apply 8 lines of glue around the round pattern; from its outer edge towards the center, the lines don’t need to reach the center.
I applied 8 lines of glue because I prepared 8 cones for each layer for the dahlia.
The round pattern is the base.
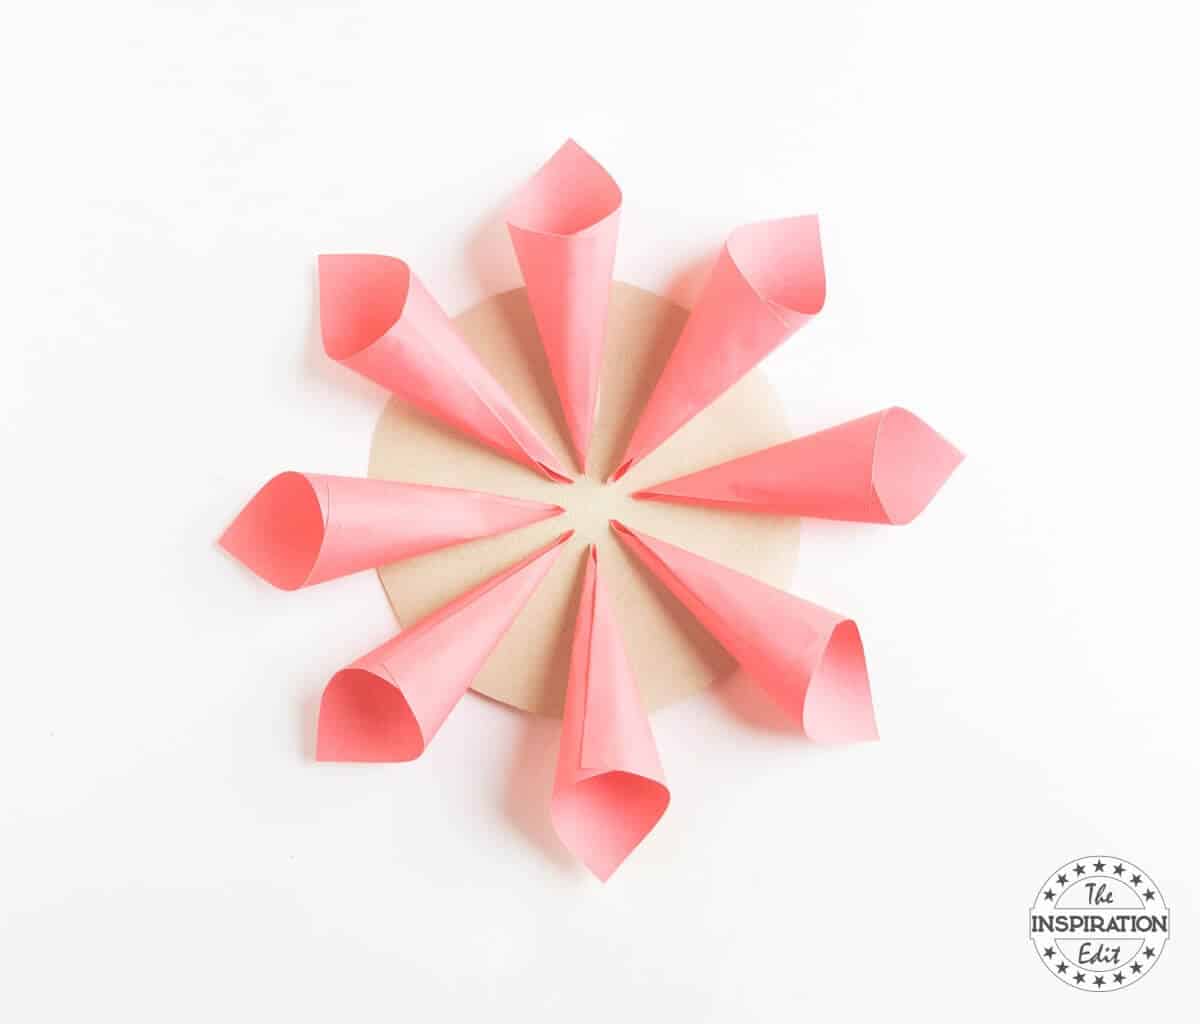
Take the large cones and place each cone on each lines of glue with the cones’ open (wider) end facing outwards.

Make sure to keep even gaps between the cones and arrange them nicely.
Go for the next layer with the medium sized cones.
Glue the medium cones slightly inwards (joining the closed end of the cones at the center of the base and between 2 larger cones.
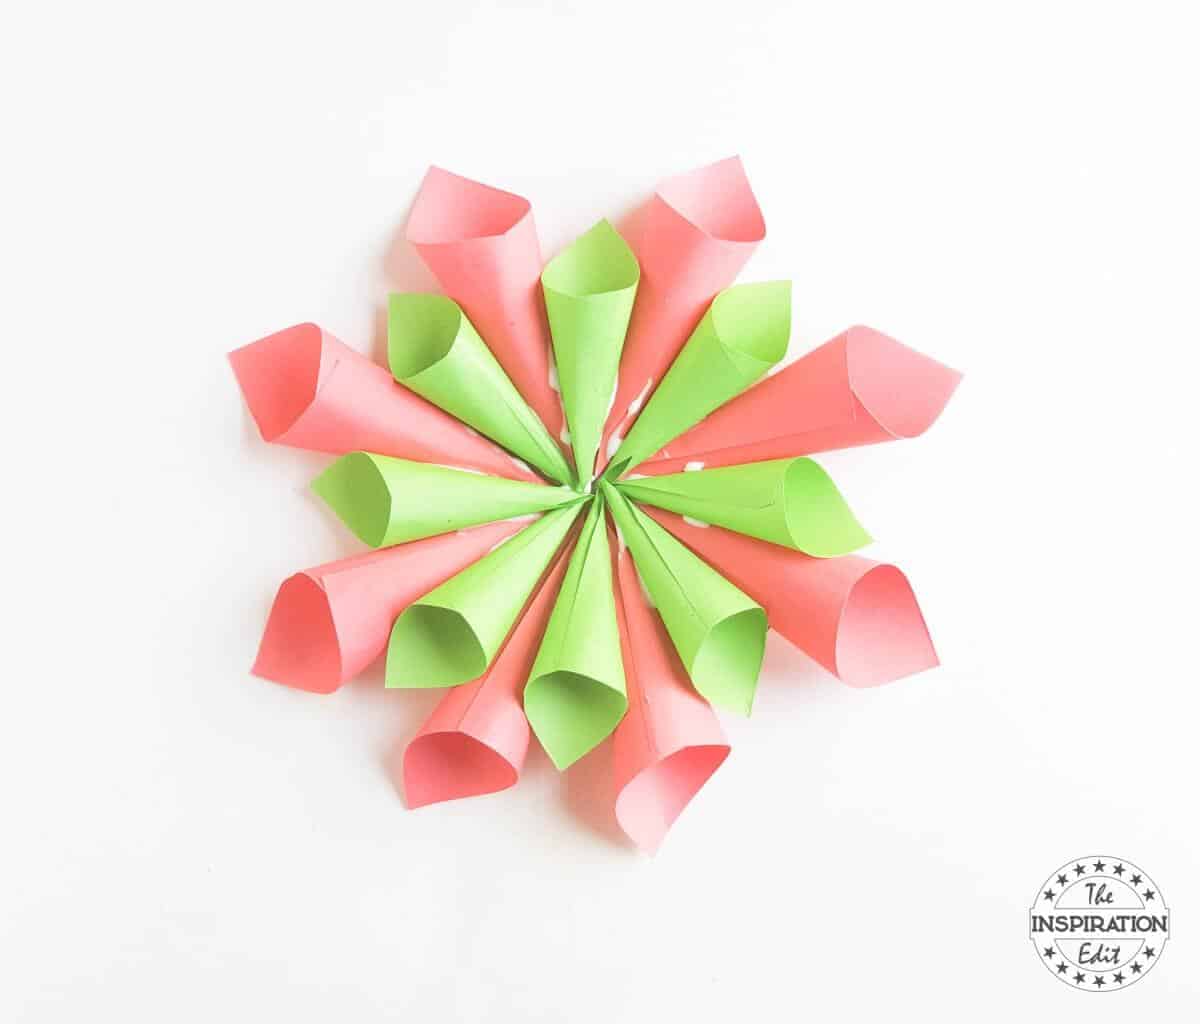
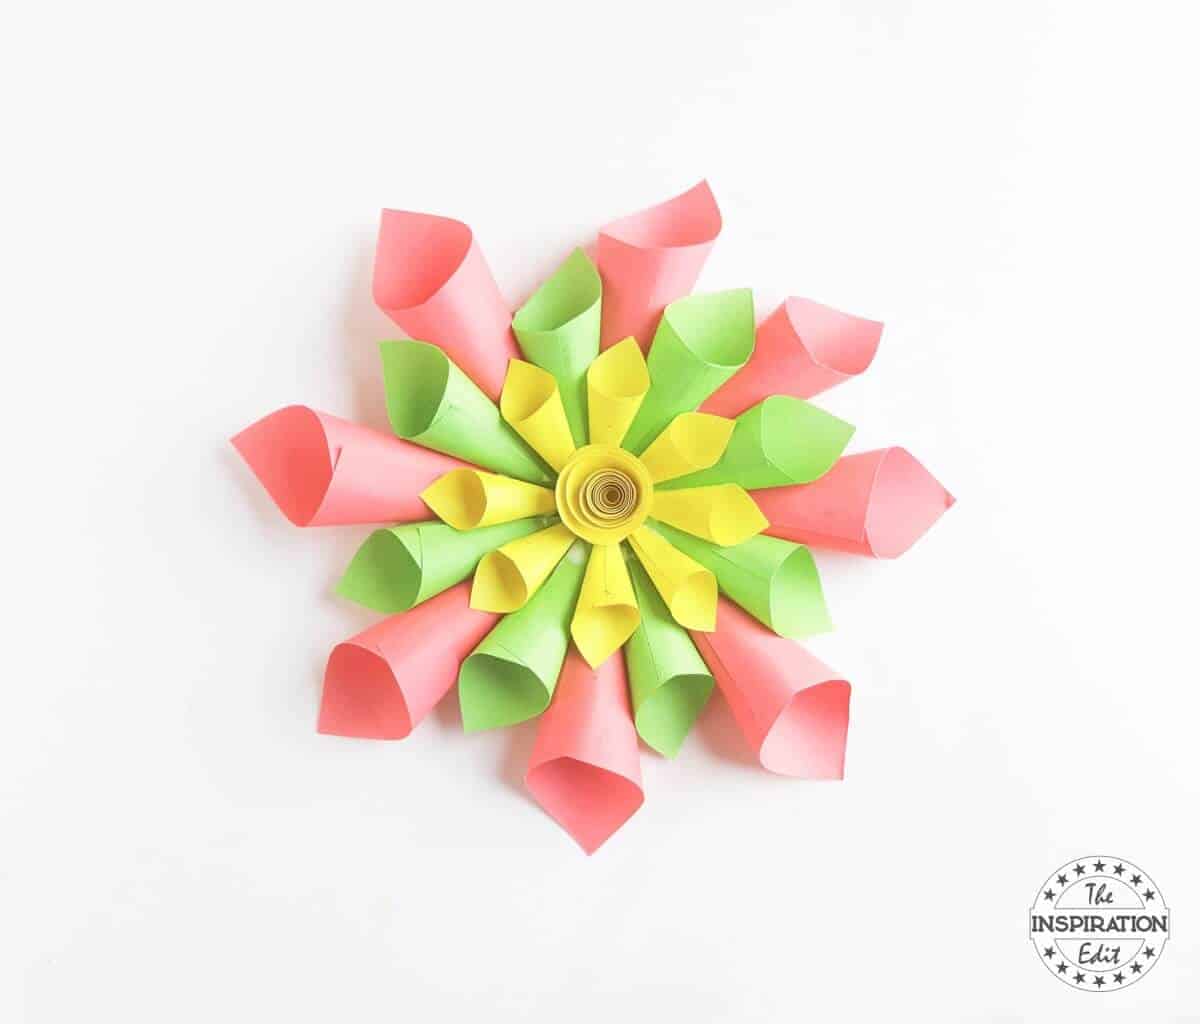
Now glue the small sized cones similarly; gluing each small cone between 2 medium cones and towards the center.

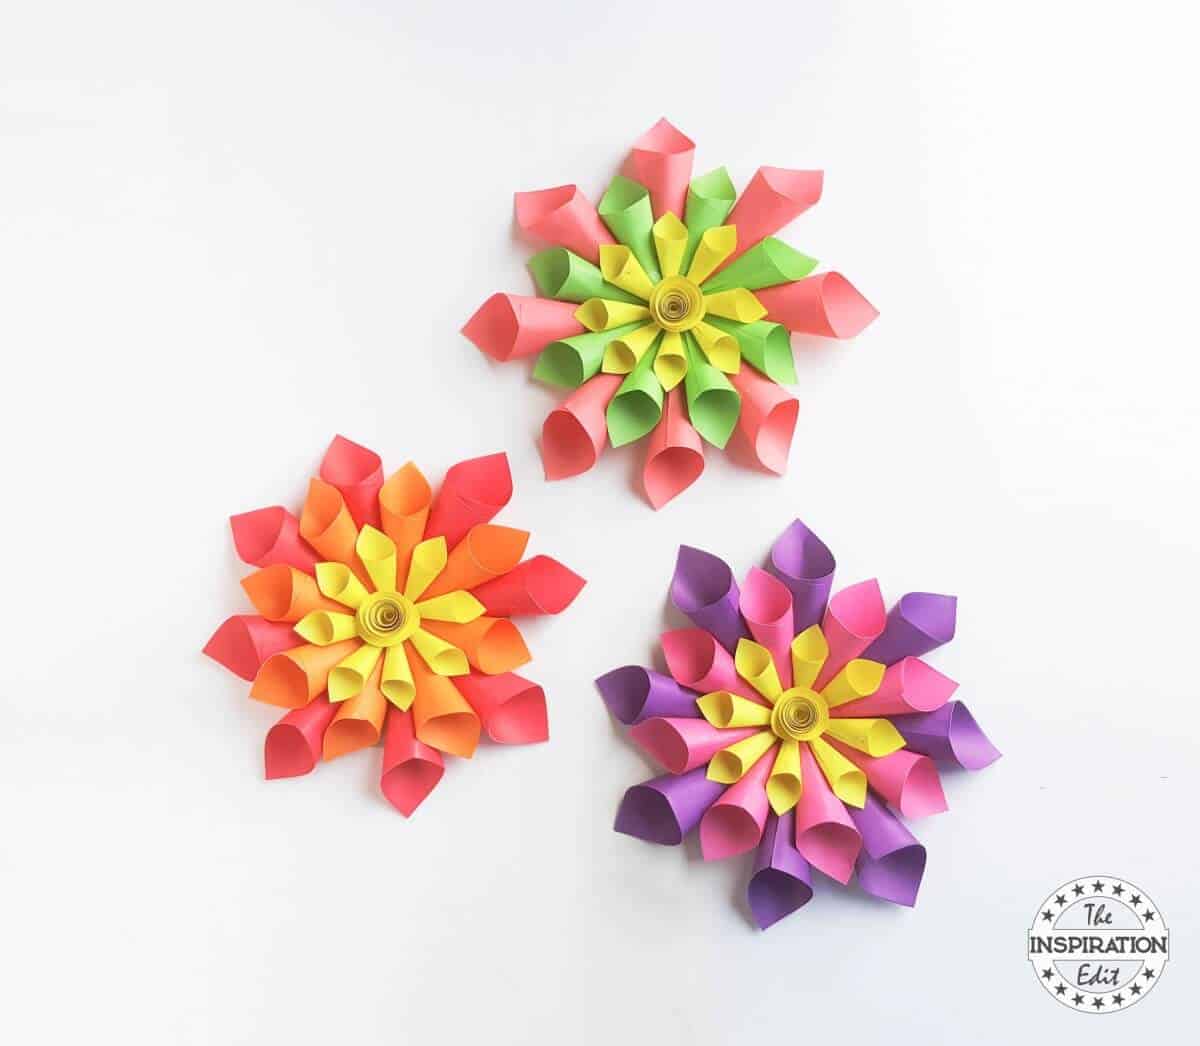
Finally glue the rolled spiral piece on the center to complete the dahlia flower.
You can come up with many variation by mixing and matching different colours; and different numbers and layers of cones.
Enjoy this fun and easy paper flower craft!

DIY Paper Dahlia Flower Craft For Kids

This is a tutorial on how to make a paper dahlia flower craft.
Materials
- Coloured craft paper– 3 or more colours of your choice
- Cardstock paper
- Craft glue
Tools
- Scissors
Instructions
Select 3 or more different coloured craft paper for the flower and cut out square shapes from them.
Cut out the squares in 3 different sizes and for each size cut 8 pieces of squares.
Also, cut out a round pattern and then cut it into a spiral.
Take any one of the square cut outs and fold any one corner towards the middle of the square.
Now fold the opposite corner towards the middle (keeping the previous fold on its place).
Overlap both folds by 1 cm and glue the overlapped part to secure the cone shape.
Similarly, create cone patterns with the rest of the square cut outs.
Take the spiral pattern and start rolling it from its outer edge towards the center and then glue the roll with the center to secure it
This will be the center part of the flower.
Cut out a round shape from a cardstock paper.
The size of the round cut out would depend on the size of the square cut outs.
Apply 8 lines of glue around the round pattern; from its outer edge towards the center, the lines don’t need to reach the center.
I applied 8 lines of glue because I prepared 8 cones for each layer for the dahlia.
The round pattern is the base.
Take the large cones and place each cone on each lines of glue with the cones’ open (wider) end facing outwards.
Make sure to keep even gaps between the cones and arrange them nicely.
Go for the next layer with the medium sized cones.
Glue the medium cones slightly inwards (joining the closed end of the cones at the center of the base and between 2 larger cones.
Now glue the small sized cones similarly; gluing each small cone between 2 medium cones and towards the center.
Finally glue the rolled spiral piece on the center to complete the dahlia flower.
You can come up with many variation by mixing and matching different colours; and different numbers and layers of cones.
Enjoy this fun and easy paper flower craft!
MORE CRAFTS YOU MIGHT LIKE:
FANTASTIC FROG COUNTING MATS WITH FREE PRINTABLE
PAPER CATERPILLAR CRAFT AND LEARNING IDEAS
PAPER PLATE EARTH CRAFT KIDS WILL LOVE
Angela Milnes is a Qualified Early Years Teacher who has specialised in Preschool and Kindergarten teaching. She has a wealth of experience teaching young children and is passionate about kids crafts and having fun as a family. Angela has also taught cooking skills and loves to share both family recipes and easy crafts here on The Inspiration Edit. Follow her on Pinterest!


